AFM Home | Sample Articles | Attacking the Line of Scrimmage
Sample Articles
Attacking the Line of Scrimmage
By Bobby Allen
Co-Defensive Coordinator, Arkansas
|
Philosophy: At the University of Arkansas our attitude is to attack, disrupt and create a new line of scrimmage. Our terminology is to attack, bend and spill the ball outside. We want to create one on one match-ups for our front. Our LB's are fast flow, thus creating stress on an offensive lineman to execute two-on-one-combo blockers. We expect to turn those two on one combo's into one on one match-ups. Our linemen are playmakers are not space eaters. The only exception would be true double team on a 3-technique. Other than that, we would expect our d-linemen to release their block and have an unbelievable desire to make plays. The attack principle is our initial get off and key reaction.
Fundamentals and Drills I. Stance - Everything starts here. II. Alignment & Assignment - The knowledge to play the scheme and understanding the game. III. Get Off - Attack, first Step Critical, Penetration, Create a New L.O.S. IV. Hands - Fastest part of your body - use them. V. P.O.A. LEVEL - Low man wins leverage and separation. VI. Release - Don't stay block - escape and go - make the play. * Bottom Line - Play hard and have fun. Football is a game- Enjoy it! I. Stance - We work on stance every day. We practice both right-and left-handed stances. Our feet are roughly shoulder width apart with a toe-heal relationship. Our down hand is slightly in front of our eyes, with our off hand cocked and in a ready position. The important thing is to be comfortable, be in a position to see your key and to be able to attack the L.O.S. without over striding. * Pre-Practice work on both right-and left- handed stance. On the snap, they attack a bag for two steps. Working to maintain the same pad level they had in their stance. II. Alignment & Assignment - This is their roadmap to understanding the scheme and their role inside the scheme. * Pre-Practice walk - through on barrels. III. Get off - The single most important fundamental we do as a defensive line is to create a new L.O.S. and play on the offensive side of the ball. We measure our get off by our feet, being in the neutral zone, once the ball disappears in the center crouch. Our emphasis is to attack, and create a new line of scrimmage. Our attack step is critical. We attack with our back leg. The length varies by each individual player. The coaching point is to be able to gain penetration without over striding and losing proper pad level. 1. Shoots - Place three agility bags in the middle of the shoot. Have a defensive linemen crowd the top of the bag in a head up position. Place a ball on a string at the opposite end of the bags. On movement, the DL should get off and run through the shoot keeping the bag between their legs. The emphasis is good first step, pad level, and proper base. (See Diagram 1) 2. Rabbit - Have an OL heels two yards of the L.O.S. Place a ball on string on the L.O.S. On the movement, the OL backpeddles for three yards. The DL must close the gap and touch the OL before he reaches five-yard depth. (See Diagram 2) 3. Scant and Redirect - Place a DL in a head up position on a stand up dummy. On the movement (ball on a string), have the DL slant right or left to adjacent linemen and react off the OL block. Usually the two blocks we work against are zone to and zone away. Coaching Points - Adjust player's stance slightly. Narrow his stagger. His first step must gain penetration to the gap he is scanting to. His aiming point is to the near hip of the adjacent linemen. Zone to - Don't get reached and redirected, flat down the L.O.S. around the dummy. (See Diagram 3) Zone away. Hip and Trial and Rip your gap. Avoid being reached by the adjacent linemen. (See Diagram 4) IV. Hand Placement - They are the fastest part of your body. Have your DL understand they are a real asset to their success. The coaching point to hand placement is to shoot your hands in a V with your thumbs at 12:00 o'clock. Using the phrase 12:00 o'clock simplifies teaching. When your thumps are at 12:00 o'clock, your elbows must be in. Putting you in the football position. Shooting your hand together in a V brings them together, increasing your chance to hit the target. During drill work using the phrase 12:00 o'clock, is a easy way a player to check himself to see if he has a proper fit. After establishing a proper fit, we designate a power hand and a trail hand. The power hand is are gap responsible hand. Our trail hand is our release hand. 1. Quick Hands - Position your DL in a six-point stance have toes, knees & hands on the ground. Emphasis keeping you eye on target and shooting your hands from low to high to the chest plate in the correct position. (See Diagram 5) 2. Sled - Working against the sled practices several fundamentals. Stance get off, pad level, hand replacements, leg drive and releases. Position DL in right and left stance on movement (ball on string) attack the sled working for a good fit. On coach's command, work a release off the sled. (See Diagram 6) V. Pad Level (P.O.A.) - is critical for a DL success. We want to keep our eyes below the OL chin. Our elbows lock out and our thumps at 12:00 o'clock. Gaining proper leverage and separation allows us to control our gap and win our one on one-match ups. * Have two players square off face to face in a good football position. Designate one offense and one defense. On command, have both shoot their hands and work proper fit and leverage. (See Diagram 7) VI. Release - To be a playmaker you have to get off blocks as quickly as possible. When teaching releases we establish a power hand and trail hand. The gap responsible side arm is the power hand. Our release techniques are the rip and swim. To have a good release we must execute our pre-mention fundamentals. * The release drill is an extension of our leverage drill. We designated a power hand and trail. On command, he escapes has gap with a rip tech. Our next progression is to go to two-on-one. Here we work on all our run blocking schemes. (See Diagram 8)
ATTACKING OFFENSIVEBLOCKING SCHEMES 1. Base - Attack, neutralize and leverage your gap. (See diagram 9) 2. Reach - Attack, establish a power hand and rip your gap with trail hand. (See Diagram 10) 3. Cutoff - Attack, bend has redirect off the hip on the inside release. Rip your backside arm (trail) through voiding being reached. By the adjacent linemen. (See Diagram 11) 4. Guard Pull - Attack and work for penetration. First try to hip and trail the guard. Dipping through the back block into your gap. The angle off the back block will have a lot to do with how we react to this scheme. When the back block is high (doesn't cross your face) penetrate, rip, hip and trail the guard. (See Diagram 12) When the back block is so flat (cut off) cross face and pursuit to ball. (See Diagram 13) 5. Veer with lead blocker - Attack off the hip of the inside release and run the path looking for first threat. Attack the first threat inside out. Accelerate and run a circle around the block forcing the ball to spill outside. (See Diagram 13 and 14) 6. Veer with no lead blocker- Attack off the hip and run the path pick up backfield action. Secure the cut ball. (See Diagram 15)
|

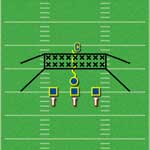
Diagram 1. 
Diagram 2. 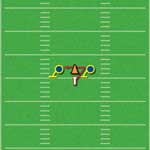
Diagram 3. 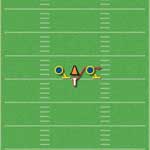
Diagram 4. 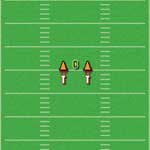
Diagram 5. 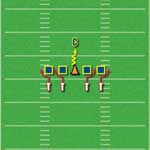
Diagram 6. 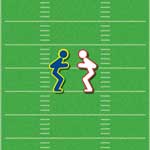
Diagram 7. 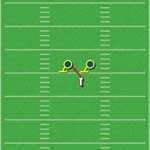
Diagram 8. 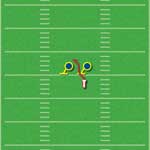
Diagram 9. 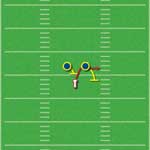
Diagram 10. 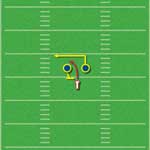
Diagram 11. 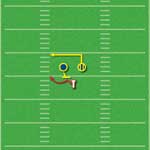
Diagram 12. 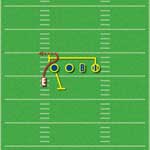
Diagram 13. 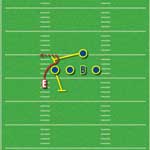
Diagram 14. 
Diagram 15.
|
| Subscribe
now to view the all the issues online -
|