Article CategoriesAFM Magazine
|
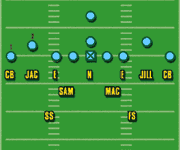
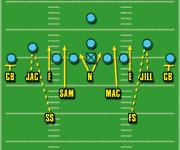
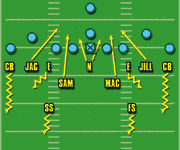
Stop on a DimeGrambling State\'s dynamic dime package unwrapped!by: Heishma Northern Defensive Backs Coach & Special Teams Coordinator © More from this issue The past two seasons our defense has been in the top 10 in sacks, interceptions and turnover margin. During the 2001 season our defense was ranked in the top 15 in both rushing and scoring defense. We also finished fourth nationally in passes intercepted and third in total takeaways. A great deal of our success stems from our dime package. The following will familiarize the reader with the personnel and pressures we use in this package. The focal point being the defense of a double slot formation, the primary set we see in passing situations. (See Diagram 1.) Personnel Groups E - two best pass rushers regardless of size must be able to keep contain N - most athletic interior player with great quickness and a nose for the ball Sam & Mac - best run stoppers Jac & Jill - fastest/aggressive defensive backs CB - best man-to-man defenders S - best tacklers in secondary
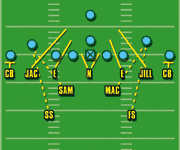
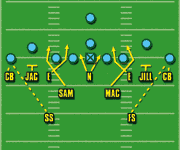
The first pressure is Combo Blast. This pressure is designed to bring pressure off the edge. We use this versus an opponent whose Quarterback attempts to escape by releasing outside. The cornerbacks play man to man and more times than not we double the #2 receiver with the Sam or Mac and the safety to that side of the field. (See Diagram 2.)
BRACKETS 1, 2
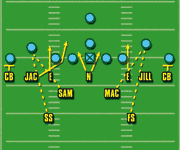
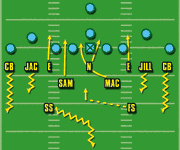
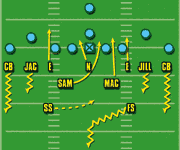
NT - head up on center 2 way go preferably away from slide E - set 5 on tackle outside SAM &MAC - stack behind DE; rush B Gap JAC & JILL - man to man on #2 receiver taking away inside S - inside help on #1 receiver CB - man -to- man with inside help from safety The same as Brackets 1 with the safeties helping Jack & Jill in coverage, depending on leverage. (See Diagram 5.) Brackets X is another variation of the same defense except the Defensive End and the Sam or Mac to their side will exchange gap responsibilities. We will still use 1 or 2 as our coverage. (See Diagram 6)
N - 2 way go
N - O Tech or shade to strong side slant to A gap weak E - align in 5 tech responsible for contain Sam - stack behind N or E push B gap strong Mac - stack behind N or weak E rush A gap strong Jac & Jill - keep #2 receiver from releasing inside. Responsible for curl, rally late to flats. SS - rotate to middle third deep FS - check run to B gap weak, then play middle of field (hook) look for deep crossing route C - responsible for deep 1/3 (outside) WEAK SHOOT STRONG LURK
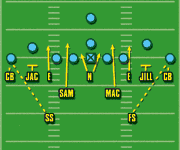
N - O Tech or shade WK responsible for A gap strong E - 4 or 5 tech contain rush Sam - stack behind N or strong E rush A gap weak Mac - stack behind TE rush B gap Wk Jac & Jill -same as strong shoot C - same as strong shoot SS - check run to B gap strong then play hook looking for deep crossing route FS - rotate to deep middle CLAW DOUBLE DECA LANES The pressure is designed to cause confusion in both the protection scheme and the hot read of the QB. We play basic 1/4 lanes coverage with this pressure. If we decide to play man, the ends will rush the B gap to their side while Sam & Mac rush A gap to their side. (See Diagram 9.)
N - 0 Tech jams center and drop straight back. E - Deca 5 Tech step hard at tackle and drop looking for slant route. Sam & Mac - Stack behind E or N rush B Gap Jack & Jill - Align over slot receiver, blitz outside the tackle (responsible for contain) CB - Outside leverage, responsible for outside 1/4 S - Split difference between #1 receiver and tackle, responsible for inside 1/4. One may have noticed we did not discuss covering the tailback. We cover the back depending on how he is used in pass routes, protections, hot releases, and screens that opposing teams may run against. A few strategies we use are rush to cover (put) by the outside rusher on outside release, spy with the nose for the screen after he determines the draw is no longer a threat, and pursue the to ball on short throws. What may seem like a lot to our opponents is simple for our players. Understanding the concept of the defense allows our players to play at a high level. This permits us to show a different alignment and then play one of the defenses we have provided for the reader. We at Grambling know that our dime package was a big part of our Back-to-Back Black College National Championships and we hope it will assist you in improving your defense. GRAMBLING 38: Total turnovers (ranked 3rd in NCAA Division 1-AA). |
|
| HOME |
MAGAZINE |
SUBSCRIBE | ONLINE COLUMNISTS | COACHING VIDEOS |
Copyright 2024, AmericanFootballMonthly.com
All Rights Reserved


