Going For Two
Kent State\'s 2-point philosophy
Asst Head Coach, Kent State University©
More from this issue
If you liked this article, here are three others just like
it:
|
With todays modern defenses, it is often times difficult
to predict exactly what youre going to see defensively on
the goal line, so you need to have plays designed to be successful,
versus both man coverage and zone coverage, or a combination of both.
We will game plan our two-point play just like we would any other
situation play based on what we have seen in previous games from
the goal-line defense.
2-Point Plays
Our 2-point philosophy at Kent State is to accomplish three things:
1. Create confusion on the defensive side of the football by:
A. Shifting
B. Motioning
C. Creating an undefined formation
from game alignments
D. Or a combination of the above
2. Get the ball into the hands of our best player or players.
3. Give ourselves more than one option in having the play succeed.
The simplicity of the play will greatly determine its success,
but the complexity of adjustments forced on the defense will more
clearly define our advantage.
The diagrams will identify the pre-adjustment formation, the adjustment formation
after shift and/or motion, and the subsequent play with specific position responsibilities.
2-Point Play
Play Call: Q8 Option Pass
Field Alignment: From Left Middle
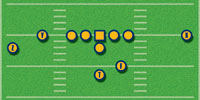 Diagram 1.
 |
Pre-Shift Formation: Is light left flex. This formation shows a three-wide
receiver look with actually a flexed tight end (Y) and a light backfield set.
Z will line
up actually opposite the pre-snap formation with a 12-yard split. Y will line
up flexed at a 6-yard split in order to pull a secondary coverage defender
on him. X will line up opposite the pre-snap alignment with a 10-yard split.
The
fullback will line up in a light left position, which is also opposite of his
pre-motion position. The tailback is aligned behind the QB and does not adjust
his alignment. The QB must give a shift alert based on normal cadence protocol.
(See Diagram 1.)
Shift To Alignment Formation: Heavy Louie Change
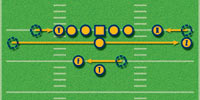 Diagram 2.
 |
X should start the swift process by moving his alignment in from 10 yards to
4 yards and staying on the line of scrimmage. Y will shift into a tight alignment,
as Z hurries and shifts to the opposite side of the formation 4yards outside
of X off the line of scrimmage. The fullback shifts from light to heavy on
the side of the tight end (Y). Now we have shifted personnel and backfield
strength
and changed the two-receiver side, all before the snap. The tailback stays,
and the QB now readies himself to continue his cadence while making sure everyone
is set before putting the FB in motion to change backfield strength one last
time. (See Diagram 2.)
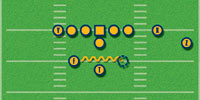 Diagram 3.
 |
Pre-Motion Formation: Heavy Louie - all personnel will now be in the proper
pre-snap positions, except for the fullback, who will now motion from a heavy
alignment
to a light alignment back away from the TE (Y). (See Diagram 3.)
Pre-Snap Formation: Light Louie - the QB will reverse
out to a depth of 6 yards. This roll action will allow him to immediately
locate X as his shoulders
and
eyes come around. His reverse pivot should be past six oclock. As he locates
X and X is breaking clear, immediately throw the ball on the run (#1). If Xs
pattern does not develop, you must keep on the run to the outside, recognizing
the block of the tailback and run the ball (#2). If the QB must pull up or gets
boxed in from the outside, he may peak at Y as a late option throw (#3). Z releases
up field 4 steps and aggressively runs a drive route at up field shoulder of
the #2 defender. He will then throttle down over the play side guards
position and be ready to slide back to any open area. X will release up field
and break outside immediately underneath the Z receivers junction.
X must not get held up and must look for the ball immediately.
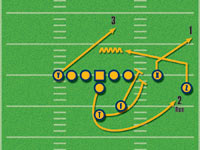 Diagram 4.
 |
Y will
block aggressively
on and after 3 counts sneak inside and release on a climb route as
he becomes the #3 look late for a QB in trouble. Y will gain depth
to 1
yard from
the end
line. The fullback will drive aggressively to the first man outside
the tackle and cut him. If he retreats to coverage, the fullback
will turn
in on the
first man inside at the line of scrimmage, the tailback will aggressively
drive to
a point 2 yards outside the offensive tackle and aggressively cut the
first defender that crosses his face. (See Diagram 4.)
2-Point Play
Play Call 24 Roll Tailback Flat (2 Tailback Personnel)
Field Alignment: Left Hash or Left Middle.
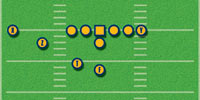 Diagram 5.
 |
Pre-Shift Alignment: Formation Weak Roger - X will
align with 10-yard split, two receivers to boundary, again opposite
pre-snap alignment. Z will align
with 5-yard split opposite pre-snap alignment. Y will align in normal
right alignment,
which also is opposite his pre-snap alignment. Fullback will align
behind the QB. The tailback will align in a weak position away from
the tight end (Y).
The QB will note secondary personnel alignment and begin cadence to
signal shift.
(See Diagram 5.)
Shift to Alignment: Formation Weak Left
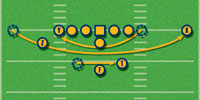 Diagram 6.
 |
X will shift to 15-yard split on opposite side of original alignment.
Z will remain in his alignment until everyone is set after their shifts
and the QB
signals motion (Diagram G). Y shifts back to the left side of ball
in normal alignment.
Fullback will remain and the tailback will shift from left to right
weak, which is also opposite his original alignment. The QB must note
that all personnel
have made their shifts and are set and ready. (See Diagram 6.)
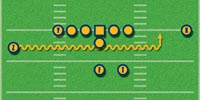 Diagram 7.
 |
Motion Adjustment: Z is now the motion man, all shifts
have been made, then personnel must be stationary for a full count
in order for the QB to put Z
in motion. Z
will go in motion to a position of 7-1/2 yards outside the tackle and
square his shoulders to the line of scrimmage before running his route.
(See Diagram
7.)
Pre-Snap Alignment Formation: Weak Louie - QB will
fake 24, then roll to depth of 6 yards - he will check Z on a quick
7 route, then look directly
to the
tailback in the flat. If
the tailback
is covered, tuck and run the ball for the 2-point conversion. If the
QB would get bottled up on contained, he may look to X, then Y, as
outlet on the opposite
side of the field.
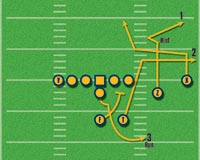 Diagram 8.
 |
X will run a 4-yard drive route to the inside to junction with the
tailback, then turn up field and hook 1 yard from the end line. Z will
motion to
a mid-point position between the tackle and the X receiver, release
up field
and hint to
the inside and look on a quick 7 route to the corner of the end zone.
Y will protect backside edge and may release on an arrow (see Diagram
H)
after a
three-count. The tailback will release and run up field to a junction
with X at the junction,
break quickly and directly to the flat, look for the football. The
fullback will fake 24 if blitz, forget fake and protect. (See Diagram
8.)
I hope these two plays will help get you in the end zone for 2 points.
Maybe you can pull an idea or two out of these anyway. Remember, it
is very important
to game plan
according to goal line coverage schemes, but the specific plays will
give you an opportunity to score whether you see run or zone coverages.
The other option you have with these or any other goal line play is
to run them, the same play, the same personnel, out of a bunch formation.
When doing
this
you can count on getting some type of zone check off, or otherwise
the route junctions will surely get you someone running wide open.
On behalf of the Kent State football office, we want to thank you very
much for this opportunity to share with you. Best wishes to you all
in this upcoming
season.
About the author
Dan Kratzer
A veteran of 13 seasons as a collegiate head
coach, Dan Kratzer is in his third
season as Kent State Universitys assistant head coach. In that position,
he coordinates the team's travel plans and assists with compliance issues in
addition to serving as the Golden Flashes head coach in the absence of
Head Coach Dean Pees.
Kratzer also is the position coach for the wide receivers. In his first season
in 2001, he coached Jurron Kelly, who concluded his career as Kent States
second all-time leading receiver in both receptions and receiving yards. |


 Digital Download - 304 Pages of Football Forms for the Winning Coach