Robber Coverage Out of an 8-man Front
by: Marvin SandersDefensive Back Coach, Nebraska©
More from this issue
On behalf of Frank Solich and the entire University of Nebraska
Football family, I would like to say that it is an honor and privilege
to be asked to write an article for
American Football Monthly.
As a firm believer in trying to gain knowledge from any source
available, I have found
American Football Monthly to be a valuable
asset.
Throughout my career I have had the fortune to be a part of some good programs
and learn from a lot of great football coaches. Hopefully there will be something
in the proceeding section that you may find beneficial to you.
Today I would like to discuss a coverage out of an eight-man front defense. Eight-man
fronts are good defenses versus the run, but when implementing this type of defense
you must develop a coverage that will not make you vulnerable to the play action
pass. Cover 5 Robber, as I have called it in the past, is a two-deep coverage
with a Safety being a Robber off the No. 2 Wide Receiver.
Let us start by showing the base alignment of the eight-man front versus a base
pro formation. Once we have discussed the basic alignment and assignments versus
basic 21 Personnel Formations we will look at some adjustments for when teams
begin to break from the basic 21 Personnel Sets.
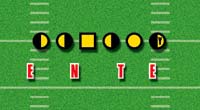
Diagram 1.
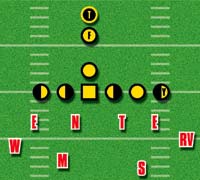
Diagram 2.
|
Defensive Line (Diagram 1):
Weak Side End = 5 Technique
Weak Side Tackle = 2I Technique
Strong Side Tackle = 3 Technique
Strong Side End = 7 Technique
Linebackers (Diagram 2):
Sam = 40 Alignment - Head up on the strong side Offensive Tackle approximately
5 yards deep. (Could align Sam in a pressure alignment - on heels of the defensive
line)
Mike = 20I Alignment - Inside shade of the Weak-Side Guard approximately 5 yards
deep. (Could align Mike in a pressure alignment - on the heels of the defensive
line)
Whip = Loose 5 Alignment - Pressure Alignment on the heels of the 5 Technique
Defensive End.
Rover = Loose 9 Alignment - Pressure Alignment slightly outside of the Tight
End on the line of scrimmage.
How we have described the linebackers alignment is based off an equivalent
to the defensive line numbering system with a 0 added for the
depth of the linebackers.
Alignment for the secondary will adjust against different formations. This coverage
is best used in 21 Personnel Group (2 backs, 1 TE) situations. By knowing what
coverage calls are best versus certain personnel groups, you allow for very minimal
adjustments.
Alignment vs. Pro Formations
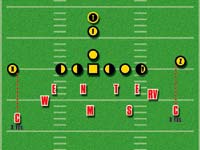
Diagram 3.

Diagram 4.
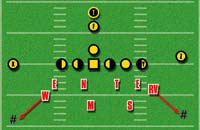
Diagram 5.
|
Corners = 8 yards off WR with inside leverage - Adjust versus various WR splits
(Diagram 3)
Free Safety = 10-12 yards off TE - Approximately aligned over OT (Diagram 4)
Now that we have the base alignments to the eight-man front, let us take a look
at the actual coverage. To properly execute the Robber Coverage, first we must
understand the roles of the underneath coverage players. 5 Robber is a coverage
that could be either a Five-Under Two-Deep coverage or a Four Under Three-Deep
Coverage. The determining factor into which set-up you will be in will be determined
by the action of the number two wide receiver/tight end.
The Whip and Rover are Buzz defenders. They are responsible
for pushing underneath the No. 1 Wide Receiver to their side while reaching
their
landmark. The landmark for the Rover and Whip is the top of numbers approximately
12 yards deep (Diagram 5). Getting to this landmark will not always be accomplished
but it gives the Rover and Whip aiming points. Even if the ball is positioned
on the hash, the landmarks remain the same. Both the Whip and Rover must
have an understanding of where their landmark is in relation to the position
of
the ball. The ball on the hash will force the field side player to really
have to
expand and the boundary side player to adjust his drop to more straight back
instead of wide.
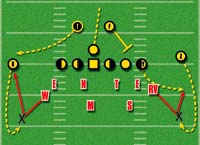
Diagram 6.
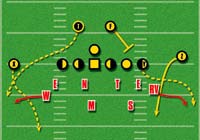
Diagram 7.
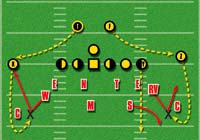
Diagram 8.
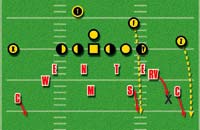
Diagram 9.

Diagram 10.
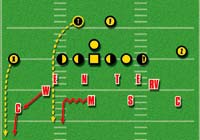
Diagram 11.
|
The Rover and Whip are considered 1 to 2 defenders. They will both push underneath
the No. 1 Wide Receiver until No. 2 threatens the flat zone. When this happens
the Rover and Whip must jump No. 2 in the flat (Diagram 6). If the split of the
No. 1 Wide Receiver is wide, the Whip and Rover may be able to hold off the Curl
Zone a little longer in order to buy time for either the Free Safety or the Mike
to expand to the Curl. If the No. 2 Wide Receiver runs a wheel route (Out/Up)
the Rover and Whip must run with him (Diagram 7).
Sam is a 3-to-1 defender strong. Sam must drop on top of No. 3 in the hook zone.
If No. 3 leaves the zone, Sam must expand to the No. 1 Wide Receiver (Diagram
8). If the No. 3 Receiver decides to push deep through the hook zone, Sam is
responsible for carrying this receiver deep (Diagram 9).
Mike is a 2-to-1 defender to the weak side. Mike must drop over top of the No.
2 Wide Receiver in the Curl Zone. If No. 2 pushes flat, Mike must expand to No.
1 (Diagram 10). If the No. 2 Receiver pushes deep through the weak curl zone,
Mike is responsible for carrying this receiver deep (Diagram 11).
Corners are half-field defenders. They are responsible for all deep throws to
the No. 1 Wide Receiver. A key coaching point for Corners is to understand they
will have help on all underneath routes (12 yards or less) by the No. 1 Wide
Receiver (Diagram 12). Corners should stay on top of underneath breaking curl
and deep out routes. Due to the depth of the drops of the underneath defenders,
corners should be in position to intercept any over throws by the quarterback.
Corners should play very aggressive on all deep routes by the Wide Receiver.
The Free Safety is a 2-to-1 defender. The Free Safety will carry the No.
2 Wide Receiver or Tight End on all vertical and inside sit-down routes
(Diagram 13).
If the No. 2 WR/TE goes flat, the Free Safety must Rob the curl of No.
1 (Diagram
14). If the No. 2 and No. 3 Wide Receivers are in a potential immediate
exchange position (No. 3 can go flat now), the Free Safety and the Sam
can give each
other a Switch call and exchange responsibilities based on the immediate
action of No. 2 and 3. If No. 3 immediately goes flat, declaring himself as the
new No. 2 Wide Receiver, the Free Safety in a Switch call
will expand to the curl and the Mike will now sit on top of the new No.
3 (Diagram
15).
 Diagram 12.
 |
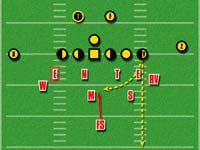 Diagram 13.
 |
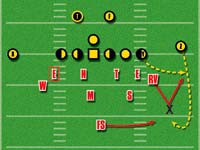 Diagram 14.
 |
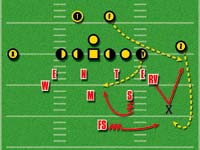 Diagram 15.
 |
The adjustment versus 21 Personnel will be against a slot formation. The only
difference comes between the Sam and Mike Linebacker. Versus a slot formation
Mike, who is now aligned to the passing strength (2 Wide Receiver side), must
adjust his alignment to a 40 and he becomes the 3-to-1 defender. Sam now must
align in a 20, as he is the Inside Linebacker away from the passing strength,
and becomes the 2-to-1 defender. The Corner on the backside should align in the
C gap approximately 9 yards deep. Although the Corner aligned on the closed side
does not have a true No. 1 WR, he is still responsible for all deep breaking
routes by the TE (Diagram 16).
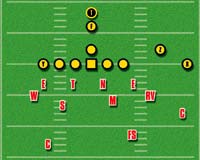
Diagram 16.
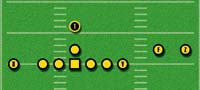
Diagram 17.
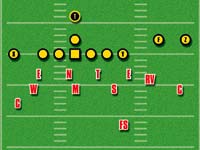
Diagram 18.
|
These alignments and assignments help form the base responsibilities
for 5 Robber. Once teams begin to break from the core 21 personnel formations
a few adjustments
need to be made. The two main breaks from the core 21 Personnel formations
are 3x1 and 2x2 set. First, let us take a look at a 3x1 formation where
the Fullback
or the Tailback has aligned outside the core to the Z Wide Receive side
(Diagram 17).
When the Fullback or Tailback align in this displaced position, the defense must
slide strong to adjust. The first adjustment comes from the strong side Defensive
End. The DE moves to a 9 technique (Diagram 18). Rover must adjust out to the
displaced back just as he would in a slot formation. The pass responsibilities
for the Rover remain exactly the same (1-to-2 defender). Sam moves to a 50 alignment
and remains the 3-to-1 defender to the strong side. Mike must adjust his alignment
to a strong side 00 alignment. His pass responsibilities remain the same (2-to-1
defender). The Whip can loosen his alignment approximately 2 yards. Pass responsibilities
remain the same (1-to-2 defender).
Two-by-two formations pose a little different threat for Cover 5 Robber. These
types of formations give the offense a better chance to stretch the defense.
If a team was giving a heavy dose of 2x2 formations with 21 Personnel, I would
recommend going to whatever you would use versus 11 Personnel groupings. For
an occasional adjustment, Cover 5 Robber still is okay to execute.
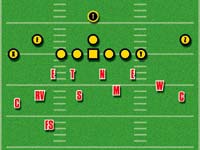
Diagram 19.
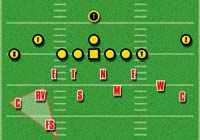
Diagram 20.
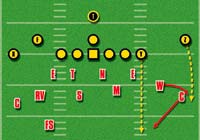
Diagram 21.
|
Base alignment versus a 2x2 formation will depend solely upon
ones
preference. In the past I have made the front call to the passing
strength. This adjustment
allows for better gap integrity and puts the Linebackers in a better
position to cover their pass responsibilities. This adjustment puts
your call side
Defensive End, and Tackle in one-on-one pass rush situations. The
Sam now moves to a
20 alignment and the Mike to a 30 (Diagram 19).
Pass responsibilities to the slot side remains the same for the Corner, Rover,
and Free Safety. To the slot side, the Rover must now be aware that the No. 2
Wide Receiver can get to the flat a lot faster and should adjust his alignment
accordingly. The Robber Coverage to the Slot side remains essentially a three-on-two
situation. This should give a little advantage to the defense (Diagram 20).
The TE/Z receiver side is the side that the offense has a chance
to stretch the defense. The No. 2 (TE) is already in a threatening
position.
The
TE has the
ability to immediately stretch the defense vertically. Due to this
threat, the Mike and weak-side Corner must communicate a Stretch call.
This indicates to the Corner that the TE is in a threatening position
and the Corner
should be prepared to help out over the top of a vertical route.
To adjust to this threat, the weak-side Corner should adjust his
alignment
slightly
deeper and more inside of the No. 1 Receiver. The Mike should also
deepen a step to
better position himself to cover underneath the vertical of the TE
(Diagram 21).
Cover 5 is not an answer all, but it is a coverage that has been very efficient
versus 21 Personnel groupings. There are a lot of strengths in running a coverage
such as this. One of the most evident strengths is that it allows you to put
eight defenders into the box to stop the run. You can and will gain a ninth defender
in run situations when the TE blocks. The Free Safety who is reading the TE/No.
2 Wide Receiver, becomes an immediate run defender once he reads a block by the
TE. Versus a team that is predominately a 21 Personnel passing team, Cover 5
Robber allows for 3-on-2 and 2-on-1 situations for the defense. One final advantage
is always having the threat of pressure off the edges by the Whip and Rover.
As with all defenses, Cover 5 has some weaknesses. The one glaring weakness to
Cover 5 is that it is not very good versus teams who will attempt to stretch
the defense. As stated earlier, if teams are breaking from the core 21 Personnel
sets (pro and slot), I would advise that you go to your 11 Personnel defensive
options.
About
the author
Marvin Sanders
Marvin Sanders became a member of Frank Solichs
Husker coaching staff after two seasons as the secondary
coach at Colorado State. Sanders will tutor the defensive
backs at his alma mater, the same position he played
at Nebraska in the late 1980s.
Sanders will be one of three new assistants on the Husker defensive staff, headed
by coordinator Bo Pelini. Pelini was involved in Solichs selection of
Sanders as the Husker defensive backs coach.
For more information email: msanders@huskers.edu |
|
|


 Digital Download - 304 Pages of Football Forms for the Winning Coach