Landmarks: The Foundation of Zone Coverage
by: Mark Miller©
More from this issue
Zone coverage contains one simple fact that is often over looked.
You are defending zones of the field. As such, you must have a
base knowledge about the depth and width of what you are defending.
I call this the geometry of football.
A football field has specific landmarks. The playing surface is 53 & 1/3
yards wide and 100 yards long with two scoring areas, the end zones, at either
end. Each end zone is 10 yards deep.
Hash marks represent a landmark system where the ball is placed and approximately
80% of the game is executed. These hash marks are 20 yards from either sideline.
The area in between the hashes is 13 & 1/3 yards wide.
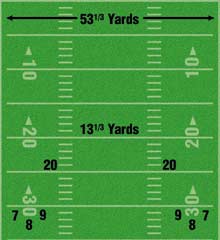
Diagram 1. Field Dimiensions |
Another set of landmarks exists in the identification of the yard line numbers.
The top of the numbers are 9 yards from the sideline. The middle of the numbers
are 8 yards from the sidelines, and the bottom of the numbers are 7 yards from
the sideline. (See Diagram 1: Field Dimensions)
Furthermore, offenses utilize these landmarks to determine their perimeter personnel
alignments and execute specific facets of their offensive attack off of these
landmarks. Conversely, a defense can and should do the same thing.
Leverage
Leverage is vertical and horizontal positioning. This can either be static or
dynamic. An alignment is static. Leverage that is maintained through movement
during a play is dynamic.
Proper leverage allows the defender to be at the reception point of the ball
and the route without extraordinary effort. A properly leveraged route has the
defender dropping to approximately the same spot that the receiver is running
to.
Seams
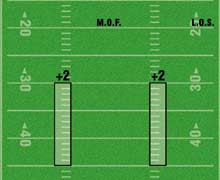
Diagram 2. M.O.F. Seams
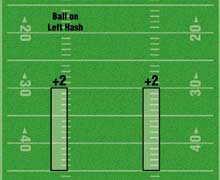
Diagram 3. On Hash Seams |
There are two specific areas of the field which a defense must
defend, the Seams.
These Seams are two points of reference for our entire perimeter defense to
defend. They are two yards wide and begin at a point 10 yards from the line
of scrimmage.
With the ball in the middle of the field, the seams include the hash marks
and extend horizontally +2 outside each hash mark. (See Diagram 2: M.O.F. Seams)
The Seams vertically extend down the football field to a depth of plus twenty five
yards. Twenty five yards is also the maximum depth at which a centerfield
defender is limited to defending just seam to seam.
When the ball is placed on a hash mark, the far seam originates and includes
the far hash mark as it has now moved to minus two yards inside this hash.
The near seam no longer includes the near hash mark. It is still plus two yards
outside
the hash the ball is placed on. (See Diagram 3: On Hash Seams)
These seams are our weakest areas of coverage, and as such they are main points
of reference. Offenses will threaten the defense here horizontally and vertically.
Therefore, we must re-route vertical threats at the ideal collision point of
10 yards deep.
No Cover Zone
The No Cover Zone is an area that extends from the line of scrimmage
to a vertical depth of seven yards down field. The area in between the hash marks
is identified as The Box. The area outside the left hash mark is
identified as the The Left Flat. The area outside the right hash
mark is identified as The Right Flat.
Our underneath coverage defenders will always drop clearly out of the no cover
zone. Our philosophy dictates that our underneath defenders drop to a depth
of at least 12 yards and then break up on passes in the no cover zone.
Underneath Coverage Zones
The underneath coverage area begins at a depth of 8 yards and extends vertically
to a depth of 14 yards.
We utilize the landmarks of the field to define our underneath coverage zones. The
Out Zones begins on the sideline and reaches a point minus 1 yard inside
the numbers. The Curl Zones begin minus 1 yard inside the numbers
and extend inside to a point plus two yards outside the hash marks. Each Hook
Zone begins plus two yards outside the hash marks and extends to the
middle of the football field.
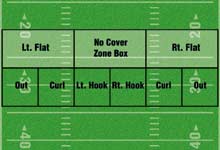
Diagram 4. Underneath Zones |
The dimensions of the hook and curl zones are
approximately eight yards by eight yards. The out zones are 10 yards wide,
but we can leverage these areas
with
the sidelines. (See Diagram 4: Underneath Zones)
Defining Midpoints of Deep Zones
Deep coverage zones have the luxury of depth and leverage. The first thing
to do when defining zone coverage is to identify the deep zone structure.
There are three basic types of deep zone coverage structures; 2 Deep,
3 Deep or 1/4, 1/4 1/2. The next step is to define the midpoints
of the deep zones. This is the geometry of football.
The given numbers in this equation is the fact that the field is 53 & 1/3
yards wide along with the location of the hash marks and numbers.
Cover 2 / Squat
We have identified this coverage as a true Cover 2 with squat corners,
our outside linebackers running with verticals, the middle linebacker dropping
to a minimum depth of 15 yards and there are two true 2 deep safeties.
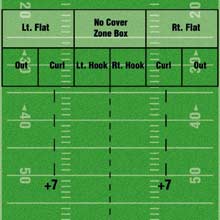
Diagram 5. Cov. - 2 Midpoints |
The
safeties are half the field defenders. Each half of the football field
is 26.67 yards wide. The midpoint of each half is 13.33 from
the middle of
the field.
From the middle of the field to a hash mark is 6.67 yards. Add another
6.66 yards to that, and the midpoint of a true half field safety
is approximately
7 yards
outside each hash mark. (See Diagram 5: Cov. 2 Midpoints)
The safeties leveraging these midpoints allows them to break downhill in
an equidistant triangular vector on passes inside or outside the midpoint.
Cover 2 / Read
We have identified this coverage as a soft Cover 2 with read corners.
Our outside linebackers are hook-to-curl droppers and do not run with verticals.
The middle linebacker is a middle dropper off of #3 and the safeties are quarters
defenders. This is a finesse pattern read type of cover 2.
Based off of pattern pressure, we could have four deep defenders. The safeties
will stay inside of the #2 receivers leveraging the seams, and
the corners will read their way deep or read their way up to the out zones
or flats.
The aforementioned threat of pattern pressure creating four deep defenders
dictates that we define this as a true 1/4, 1/4, 1/4, 1/4 zone coverage.
We are now taking
that same 26.67 yards worth of width and dividing it in half again. There
are four deep zones each width being 13.34 yards.

Diagram 6. Cov. - 2 / Soft Midpoints |
The midpoints are actual
landmarks. The midpoints for the safeties are the hash marks. The midpoints
for the sinking corners is
the middle of the numbers. (See Diagram 6: Cov. 2 / Soft Midpoints)
Again, we want our deep defenders to be able to break downhill equidistant
inside or outside the midpoints. We will leverage the midpoints inside
out.
Basic 3 Deep Zone
This is a basic four under, three deep zone. There are two hook-to-curl
defenders and two curl-to-flat defenders. The deep zones are identified
as a deep outside
third, deep middle third and another deep outside third.
Each outside 1/3 starts on the sidelines and overlap the seams to reach
inside to the hash marks, covering 20 yards. The top of the numbers are 9 yards
from the sidelines. Therefore, with the ball in the middle of the field, the
midpoint of a deep outside 1/3 is minus 1 yard inside the top of the
numbers.
The deep middle 1/3 is a more complex situation. The deep middle
defender must be able to run the C to D Gap alley in run support
and be a seam to seam, goal post defender. In most cases, he will be
charged with either
the strong side or the weak side alley. However, there are instances
when the deep
middle defender will be called upon to run the alley on either side.
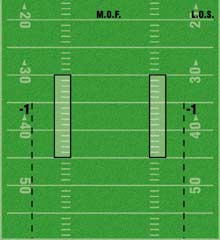
Diagram 7. 3 - Deep Zone |
Due
to the aforementioned run support responsibilities, we tell our deep
middle players to align in the B Gap to passing strength, never
within 3 yards of a hash. This alignment rule allows him to properly
execute his run support
assignment while successfully leveraging both seams. (See Diagram 7:
3 Deep
Zone)
The true midpoint for a deep middle defender is the goal post. The
goal post is a single standard holding up the cross bar and two up
rights.
Since some
schools have double standard goal posts, a centerfield player can align
in the middle
of the up rights or on a single standard and step to the proper gap
alignment with only a few steps to his right or left.
Hash Mark Adjustments
The fact that approximately 80% of the game is executed off of a hash
mark dictates that we adjust the leverage points of these midpoints.
With the
ball being placed
on a hash, the offense has narrowed the width of what we have to defend
by 6.67 yards.
Due to perimeter offensive player splits, precision passing game execution,
perimeter players speed and QBs arm strength, it is not
feasible for the defense to simply cut their landmark references by
6.67 yards.
Diagram 8. Red Zone Concept |
The Red Zone Concept of defense dictates that
the underneath defenders not drop or drift to a point closer than six
yards from the
sideline until the
ball is in the air to that area. The deep zone defenders must not drop
or drift to a point closer than eight yards from the sideline. (See
Diagram 8: Red Zone
Concept)
Depth is leverage. Therefore, we add to the boundary side area by
approximately 1/3 the distance of ball placement or two yards. The
field width is
narrowed by approximately 2/3 the distance of the ball placement
or four yards.
Cover 2 / Squat
Hash Mark Adjustments
Diagram 9. True Cov. - 2 Off Hash |
With the ball placed on a hash, we
will add two yards to the boundary half field defenders landmark
and subtract four yards from the field half field defenders
landmark.
The boundary defenders landmark is now minus two yards inside
the top of the numbers.
The field defenders landmark is plus
three yards outside the field hash mark. (See Diagram 9: True Cov. 2
Off Hash)
Cover 2 / Read
Hash Mark Adjustments
With the ball placed on a hash, we will follow our +2 / -4 rules.
Due to the proximity of our read corners to the sidelines, we will
only
add and
subtract
one yard.
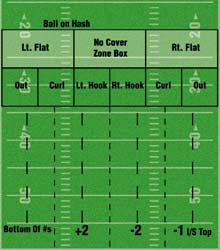
Diagram 10. True Cov. - 2 Off Hash |
The boundary half field defender will leverage a point plus two
yards outside the hash mark. The boundary read corner will leverage
a point
on the bottom
of the numbers.
The field half field defender will leverage the point minus two
yards inside the field hash. The field corner will leverage the
point minus
one yard
inside the top of the numbers. (See Diagram 10: 2 / Read Off Hash)
Basic 3 Deep Zone
Hash Mark Adjustments
The boundary deep outside 1/3 defenders landmark
is the middle of the numbers.
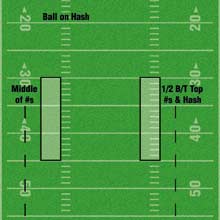
Diagram 11. Deep Off Hash |
The field deep outside 1/3 defenders landmark is the point 1/2
way between the top of the numbers and the hash mark. (See Diagram 11: 3 Deep
Off Hash)
Conclusion
These landmarks are identified as the geometric midpoints of
basic deep zones. They are meant to allow our deep zone defenders
to
break downhill
on routes
threatening their zones in an equidistant relationship.
In accordance with the base principal of pass coverage, we
leverage these midpoints from the inside out. This forces a
shorter wider
throw, thus
leaving the ball
in the air longer. The longer the ball is in the air, the more
time the defenders are afforded to reach the reception point.
A detailed
analysis
of how to
leverage these midpoints is another discussion reserved for
each individual coverage
and after pattern reading has been taught.
These landmarks represent the most detailed and accurate way
to teach zone coverage. They are great for young inexperienced
players
or
keeping things
simple for teams forced to utilize two way players.
This system of utilizing landmarks as identified leverage points
is the first step in a teaching progression to get to the most
effective type
of zone
coverage, pattern reading. Defenders must learn how and when
to squeeze routes.
Some WR releases dictate that defenders not squeeze. Conversely,
they quickly gain depth and get to the middle of their zone.
Other releases
demand an
initial squeeze and then a retreat to their midpoint. Therefore,
the landmark system
is the foundation of zone coverage.
These landmarks are specified in the rules and interpretations
manual of NCAA football. They are the same rules utilized in
Texas high
school football.
About the author
Mark Miller
Coach Mark Miller is entering his ninth season of coaching. For the past two
years he has been the Defensive First Assistant/Secondary Coach at Copperas
Cove HS in Texas. Previously, he was the Assistant Recruiting Coordinator/
Running Backs Coach at the University of Louisiana-Lafayette. From 1995-98,
Miller served as a GA on LSU coach Gerry DiNardos staff. He also lettered
at LSU as well as receiving his Masters Degree. You can reach him at
coachmarkm1@aol.com


 Digital Download - 304 Pages of Football Forms for the Winning Coach