AMERICAN FOOTBALL MONTHLY THE #1 RESOURCE FOR FOOTBALL COACHES

Article CategoriesAFM Magazine
|
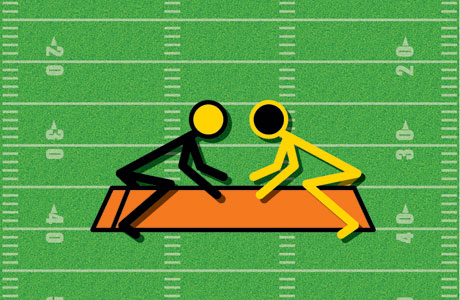
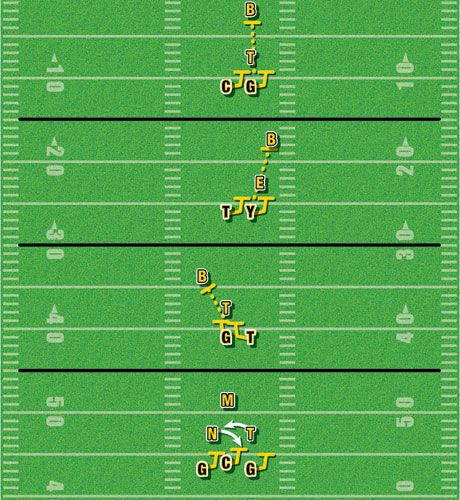
Offensive Line Drills for the Inside Zoneby: Eric DriskellOffensive Line Coach, Blue Valley HS (KS) © More from this issue Inside zone blocking is a topic that is near and dear to my heart. I always look to see if someone is talking on zone at a clinic or if there is an article in AFM because I dont have all the answers and I love stealing ideas. I have played in or been coaching in a zone scheme for the past 18 years. At Blue Valley High School, we are an inside zone running team. In the past we were a single back ace and now we have evolved to the pistol formation. Even though we are different in the backfield, we still block inside zone the same way. Zone read makes up more than half of our running game, so it is something that we work on each day. Although we are a zone team, I got some of these drills from various styles of offensive schemes and tweaked them to match our technique and scheme. These are some drills that I use as much as possible to help hone and sharpen our offensive linemens run blocking skills. Pre-Practice The first thing our offensive line does is run through an OL circuit during pre-practice. It has various stations, which deal with the basic OL fundamentals at a slow tempo. Examples of these are chute walks (duck walk), pass set, zone steps and various quick foot and hand drills. Leverage Drill The leverage drill is a very high-intensity drill that works the basic fundamentals of line play. It is good for offense and defense. When we do one-on-ones with the D-line we will also have a period for this drill. We use agility bags (step over bags) and set up 8-10 of them. The players divide up at various bags. We designate some for varsity, some for JV and some for sophomores. Only one bag goes at a time. The two players get in four point stances, straddling the bag. They line up so they are facemask to facemask in the middle of the bag. On a whistle they work to drive the other player off of the bag. When a coach determines a winner, the players stop on the second whistle. They cant turn their shoulders and they have to drive through the man. If someone turns or slips off, we restart them. When one group is finished, the next bag is ready to go and so forth. It provides a lot of reps and the chance for the coaches to see and coach every rep. The drill really helps them work on getting quick, inside hand placement and driving their feet. The bigger, stronger player doesnt always win. This is a great drill and there are some great wars created during this drill (See Diagram 1).
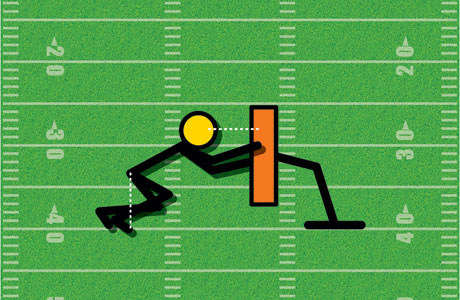
Sled/Chute Progression During our first period of practice after our warm up, we go straight to the chute and then to the sled or vice versa depending on where the D-line is starting. This is where we work our zone run progression. First we take good zone steps while loading our hands and shifting our weight. Next we go to 2-step fit; this is how we take our zone step and load our hands, drive step and punch, all in a rhythmic smooth progression. It is a great routine to get kids to move feet and hands in relation to each other. Timing is essential and without this drill progression we would have none. The Fit part of this drill is that as they punch the sled or defender holding the shield, they will hold the fit position. Back should be flat; eyes should be behind thumbs (my eyes are my sights, my hands are my guns); thumbs up; and power angles in the legs. From a side view of the fit position, if you drew a line from the hip straight down to the ground, it should pass between the knee and the ankle (See Diagram 2).
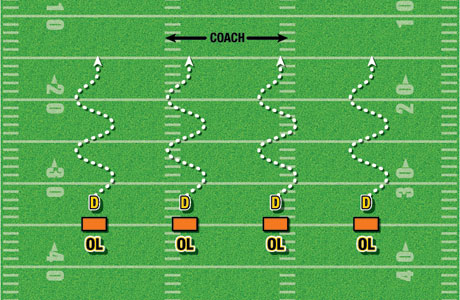
Next we progress to 2-step fit and drive. We now just add the drive portion to the 2-step fit drill. This is where we work a wide base with toes slightly out and weight on the inside of our feet. We really stress working short choppy steps. We will pause and hold at various times during the drive and check for power angles and fit position. We will also finish at a whistle, working to get our hips through and finish with high hands. We work on this progression, every day, on the 5 man, the 2 man or in the chutes. Fit and Weave Fit and weave is a drill where we start in the fit position previously discussed. We lock on a partner in this fit position. The defender gets in the best position possible for resistance. Both players are down in a good position and are heavily leaning on each other. On the cadence the offensive lineman starts driving the defender. The defender is watching the coach who is behind the OL for direction. The coach points which way the defender is to weave. The coach ends up pointing back and forth and making the offensive lineman keep a wide base and short choppy steps. This drill really emphasizes that the linemen should stay down and work their feet. You can have as many linemen go as can see your direction. I usually have them drive for about ten yards and then they flip it and offense becomes defense and visa versa. It seems to really help our kids have good active feet and stay down and have good pad level (See Diagram 3).
Fit and Finish The fit and finish drill is an extension of the fit and weave drill. We will progress through the drill as before with them weaving back and forth with resistance, but on cue from me (usually both hands straight in the air); the defensive lineman gives a weak shoulder. We have the defensive lineman raise his pad level and try to escape to a side. When the OL feels this they are instructed to slightly narrow their base, accelerate their feet and work to get their hips under their elbows. I definitely dont want to give a verbal cue for the finish part of the drill. I want the offensive line to feel the pressure change, react, and finish the block. These drills have been beneficial to our kids and to our running game. They have helped our O-line improve as they try to master the technical aspects of the position in which they play. Co-Op Drill This drill can be used for any system. This drill is used to drill multiple scenarios for combination blocks. We tailor it to our zone scheme but it can be applied to any scheme. It is basically a two on two or possibly a three on three scenario depending on the scheme. We use it to block our zone combos or our Co-Op blocks. Most of the time we use this drill in a two on two situation. We have used it as a three on three scenario to work inside zone vs. nose-tackle twist games. One point of emphasis is not to make the linebackers too active too early. In our scheme we are trying to pound the down guy until we get to the LB or he gets to us. This helps us emphasize staying on the down guy for longer and not chasing linebackers. How are you going to come off to the LB? When are you going to come off to the LB? These are all points that can be addressed and reinforced using the Co-Op Drill (See Diagrams 4A-4D).
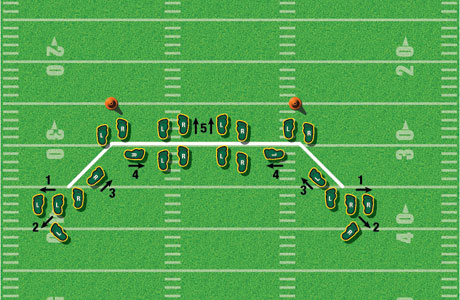
These drills have been beneficial to our kids and to our running game. I hope that they can be beneficial to you and yours. They have helped our offensive line improve as they try to master the technical aspects of the position in which they play. POINT OF VIEW KEN WILMESHERR Offensive Line Coach Grossmont College Coach Driskell has some great drills for any offensive line coachs toolbox. I am also an advocate of early outs or pre-practice. Pre-practice is a great time to work on various components of offensive line play, techniques and fundamentals. I agree you can slow down the tempo and do some very detailed teaching during pre-practice. In any facet of football attention to detail is significant. As coach Driskell stated when teaching any drill, it is imperative you teach sound techniques and fundamentals. The strength and success of every team is based on the strength of the offensive line. Therefore, teach the fundamentals because fundamentals win games. Like coach Driskell, there are days in pre-practice that I will focus on one aspect of line play, either pass blocking or run blocking. A great drill for teaching run blocking in pre-practice is the Pipe Drill. The objective of the Pipe Drill is to teach offensive linemen the proper footwork and demeanor in five-run blocking techniques vs. air. When teaching any run blocking drill your offensive linemen must create depth into the defender. An offensive lineman must do the following: first step is a position step (directional, accelerate, and lead leg); second step is a power step (explode and drive leg); on the third step your offensive linemen must maintain an adequate base (base of support) with their center of gravity as close to their base of support as possible which creates power and balance. There are two types of leverage we are always after: PAD LEVERAGE and HAND LEVERAGE. Remember your players need to strike with leverage. The Pipe Drill will allow your linemen to work on all their steps for inside and outside zone, the down block, the drive block, and pulling. Here are the five phases of the Pipe Drill: 1. Lateral jab step; set to drive for zone. 2. Bucket step; set to reach for zone. 3. Down block. 4. Trap-pull. 5. Drive block. Linemen are placed in two lines on both sides of the pipe. Right-handed stances are on the right and left-handed stances are on the left side (two at a time). There are two cones placed five yards up field on both sides of the pipe (See Diagram A).
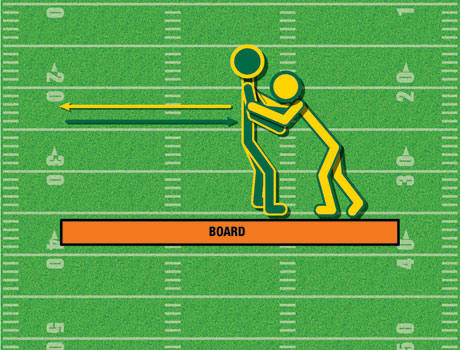
1. Lateral Jab Step. 2-Bucket Step. 3. Down Block. 4. Trap Block. 5. Drive Block. Leverage drills are so significant because the game in the trenches is about leverage. I also teach the same leverage drill as Coach Driskell and as well have had great success. However, there is also an additional leverage drill I teach called the Sumo Drill. It can be used in the off-season as well as in-season and in both padded and non-padded practices. The Sumo Drill is a great drill for teaching offensive linemen the concept of leverage. This drill teaches linemen to drop and dip the hips and shoot the hands while maintaining their base of support and center of gravity. With any run blocking drill maintaining a base of support is critical as is balance. The Sumo Drill will teach your linemen to follow through, while maintaining leverage on the defender (See Diagram B).
|

 Digital Download - 304 Pages of Football Forms for the Winning Coach

|
| HOME |
MAGAZINE |
SUBSCRIBE | ONLINE COLUMNISTS | COACHING VIDEOS |
Copyright 2024, AmericanFootballMonthly.com
All Rights Reserved