
Article CategoriesAFM Magazine
|
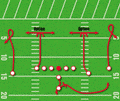
Attacking the Red Zoneby: Steve LoneyOffensive Coordinator, Iowa State University © More from this issue There are several considerations that must go into your staff's planning a comprehensive red zone ready list. As I present these concepts to you, you will have to establish your own answers to some of these factors and hopefully, be able to work your offensive system into each concept. 1. Determine where the red zone begins. If you are fortunate to have a computer printout of your opponent, you may be able to see where they change their philosophy. Many times you can sense that yourself, merely by watching a game. Also, field position will restrict your available plays. We begin to implement our red zone attacks at the +25-yard line. 2. When studying your opponent, ask yourself if there are two red zones. As a general rule, I have found defenses to pressure and blitz more from the +25 to +13 and to play a more base defense from the +12 to +4. You need to know the strength of your field goal kicker. Should your kicker not be very accurate or strong, you will need to have 4th down calls ready in your package. 3. Know where your goal line offense will begin. You can pick an arbitrary number (+5, +4 or +3) or you can determine when you will change up your personnel to two or three tight ends. 4. Be sure to account for hash marks or middle of the field considerations both offensively or defensively.
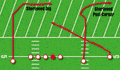
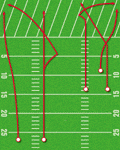
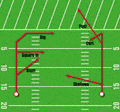
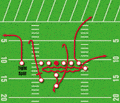
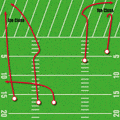
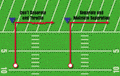
5. Understand that the vertical field shrinks as you close in on the goal line. The defense has to defend the same horizontal width against the run and pass while having to defend less vertical distance against the pass. Therefore, +30 to +20 provides your last chance to take a shot with a deep throw. 6. Certain routes such as post-corners or dig routes are highly affected by the closeness to the goal line (especially from the +15 on in). 7. Play action passers help to account for vertical shrinkage of the field due to the fact that LB'ers and DB's are frozen on the run fake not allowing them to get as much depth. 8. Offensively, you must still maximally stretch what vertical distance there is in the red zone to the maximum with streaks, fades, post-corners, post and flag-type routes. 9. Use horizontal width of the field both in your running and passing game. Remember, your vertical distance is shrinking but the horizontal distance remains constant. 10. Have your wide receivers take maximum splits to help inside breaking pass routes such as slants, square-ins, digs, shallows, posts, curls, etc. 11. Use compact splits and formations to tighten the defense so with motions and routes you can out flank the defense. 12. Be sure that as the field shrinks you don't have routes called that will run together. 13. You don't have to throw deep yardage routes to get deep yardage. Throw quickly to quick vertical routes and let the receivers run for yardage or throw shallow and dig routes. 14. Get completions. Short throws often gain large chunks of yardage due to man coverage and pressure emphasis on red zone defenses. 15. Have routes in your ready list that can beat man-to-man coverage since you will see so much of it in this field zone. Challenge your receivers to Beat the Man and to aggressively go after the ball. "The ball is our ball," must be their attitude. 16. Receivers must separate and maintain separation throughout their route. By throttling down, the receiver allows the defender to catch back up. 17. Assume the defense is going to blitz. Red zone is often the blitz zone. 18. 3-step-quick passing game is the easiest protection with efficient protections. 19. If you are going to drop back pass use only your best and most efficient protections. 20. Be able to use 7-or 8-man maximum protection with two or three receiver routes, especially in long yardage situations. Sacks will create turnovers and perhaps keep your kicker out of field goal range. 21. Shotgun formations and moving the QB (sprint out) helps combat red zone pressure and blitz situations. 22. Motions will help the QB to determine whether the defense is playing zone or man coverage. 23. Isolation or option routes are extremely effective against man emphasis. 24. Use the talents of your receivers to create one-on-one isolations to your advantage featuring a WR's size, speed and/or ability. 25. Use only your best and most effective plays. 26. Runs that will excel in this area of the field are QB draws, options and outside runs against the inside blitz and quick hitting runs against the outside blitz. Options help to neutralize eight-man fronts and cuts down on the multiplicity of coverages and hurt man coverages. QB draws hurt man coverages because no one has the QB man-to-man. Base run blocking is best because it enable you to get a hat-on-a-hat and eliminates turning someone loose, thus producing a negative yardage play. 27. Stay away from slow developing plays and pulling linemen. Both types are disrupted by penetration. 28. When the QB has 3 points, don't lose it! Stay in field goal range. You cannot afford sacks and you must use effective, low-risk plays. 29. Don't let the defense get a bead on you. Attack them. Mix up formations, shifts and motions. Mix up play calling (run and pass) and vary the snap count. |

 Digital Download - 304 Pages of Football Forms for the Winning Coach

|

| HOME |
MAGAZINE |
SUBSCRIBE | ONLINE COLUMNISTS | COACHING VIDEOS |
Copyright 2024, AmericanFootballMonthly.com
All Rights Reserved