
Article CategoriesAFM Magazine
|
Working the Right Angle in Your Passing GameFormer Assistant Coach, William & Mary, Current QB Coach Hofstraby: Warren Ruggiero © More from this issue Since the days when the great Sid Gillman started using the angle-type route for the running back, there have been many ways that teams have coordinated it into their passing games. The route is being used at all levels of football, and with every conceivable formation and personnel grouping. With the variety of offenses using the angle-type route, there have been many ways that the pattern has been run. While all of them can be effective, there are some pros and cons to each that we must consider. It also becomes necessary to have some complements or variations to the route in order to keep it healthy. To follow a logical progression of thought, we will break the route down into its most basic form. We then will examine the many ways that routes may be assigned to each receiver and the effect they have on the play. The different variations of the pattern from different sets exemplify the flexibility of the pattern from one system to another.
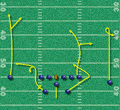
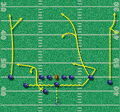
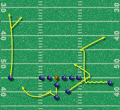
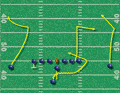
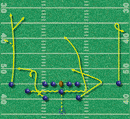
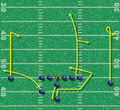
The Basic Pattern In order to run the route in its most basic form, you need to have a 3x2 receiver distribution and a strong-hot protection. The assignments are as follows (see Diagram 1): X: Seam Post on fourth outside step Z: Stem (maximum split, 12-14 yards squat and pivot down stem) Y: Read Out (10 yards inside Sam LB, reading middle of the field FB: Angle (break 3x1 outside of the TE, catch the ball 2-3 yards over tackle-tight end area) HB: Check Fan - check for blitz pickup, then seam release to 3-5 yards depth. Use outside option rules. In order to run the route in its most basic form, you need to have a 3x2 receiver distribution and a strong-hot protection. The assignments are as follows (see Diagram One): X: Seam Post on fourth outside step Z: Stem (maximum split, 12-14 yards squat and pivot down stem) Y: Read Out (10 yards inside Sam LB, reading middle of the field FB: Angle (break 3x1 outside of the TE, catch the ball 2-3 yards over tackle-tight end area) HB: Check Fan - check for blitz pickup, then seam release to 3-5 yards depth. Use outside option rules. The Quarterback Reads Versus One Safety The quarterback needs to read the middle of the field before the snap. He first has to locate the deep safeties. If the middle is closed and the FS is leaning strong, he can work the Weak-Seam Post and Fan combination. His drop is five steps and firm so he can hit the Seam Post in the crease on time. He shouldn't wait for the break; just throw it into the seam and let the receiver get it. If the Seam Post is covered from the underneath, he should hitch up to the HB Fan. The fan route has some option principles, so he must make sure to get eye contact from the back before throwing it. If the HB Fan is covered, the QB should take off with the ball right away and create a scramble or run, depending on the present rush lanes of the defense and their configuration around the pocket. If the middle of the field is closed and the FS is playing honest in the middle, it's time to work the strongside combination. The QB will take a five-big drop and firm. It is important to not step too quick and short. If the middle were to open on the snap, he would need a stretch the drop to allow the TE to work the middle. As long as the middle stays closed, and we are not hot, the progression will go from the FB Angle to the TE Out to the Z on the Stem. When facing any form of 3-Deep, we should be 3-on-2. If it is man coverage, the Stem is a good option. The drop is five-big and firm to the FB Angle. If hitting the FB, the quarterback should wait no longer than the time it takes for the back to get to the playside tackle area. He should also emphasize a high release over the defensive line to the facemask of the fullback. Do not lead the back out in front because the backside LB is waiting - and don't give him a low ball because it might get batted. Next in the progression is the TE Out. The QB should hang on his fifth step and wait for eye contact from the TE for his final move. If the TE is covered, he should take a big hitch out to the Z on the Stem. This should be a more emphasized hitch than normal to make certain that the QB has his eyes out in front of his body and can make a good decision before he is ready to release the ball. The strike point is to the outside pad of the Z, trying to bring him back to the ball and to the outside. If the Z is covered, the QB should run or scramble immediately. Versus Two Safeties If the middle of the field is open, the QB should take his five-big drop and let the TE work down the hole and read a hi-lo on the Mike LB. The pass to the TE needs to be on a rope at 18-20 yards. The passer should hang on his fifth step until the right time, but not hitch or it will be too late. If the inside two are covered, there will be a one-on-one matchup on the outside because Mike and Sam have eliminated the TE and FB, and only the corner is left. We do not convert the Z because the Y is on a vertical release and, versus a pattern-reading Cover-2 or a Quarters coverage, the corner is sinking with the Z. This allows the Z to have a successful Stem route. Again, we will take a big hitch to the Z as option No. 3 in the progression. If it were a hard-corner 2-Deep, the route could be game planned to a Fade, or the QB could work the HB Fan as No. 3. Versus no blitz and no forced hot reads, he can hit the backside Post. Route Variations: Z Comeback Another route for the Z is an 18-yard Comeback. This adjustment gives the QB more time to come off the inside combination before the Z will open up. The Comeback will time up with two hitches by the QB after he makes a five-step drop instead of the one hitch, which the Stem allows. TE Read-Cross Another variation of the tight end's route is a Read-Cross. If the middle is open, he can work his basic Cross rules at 10 -12 yards (over top of the Mike). (See Diagram Two) Bunch Formation Another route possibility for the Z is a Bunched look with the TE/FB and put him on a corner (see Diagram Three). Z Post A good variation for the Z versus a Quarters-coverage team is a Post (see Diagram Four). TE Seam If you have a QB who can throw the Seam Post well, put the TE on a straight Seam route, without a break-off in or out (see Diagram Five). X Hitch A Locked-Seam route is an easier option for your tight end. If that suits your TE, and your QB and X are not great at the Seam-Post throw, the best thing to do is to put your X on a Hitch route (see Diagram Six). Backside Curl/Flat One way to hold off the backside LB, who can get nosy on the frontside angle, or the strong rotation by the secondary, is to place a Curl/Flat combination on the backside (see Diagram Seven). The angle route has been one of the most efficient patterns that I have been associated with. There are many other variations and complements, but you can only practice and execute so much. Each year it's important to evaluate your personnel and the defenses you will face and then decide which versions will be the best for your offense that year. |

 Digital Download - 304 Pages of Football Forms for the Winning Coach

|

| HOME |
MAGAZINE |
SUBSCRIBE | ONLINE COLUMNISTS | COACHING VIDEOS |
Copyright 2024, AmericanFootballMonthly.com
All Rights Reserved