Boise State\'s Defensive Line Run Technique
Defensive Line Coach
Boise State University©
More from this issue The instant we recognize the
blocking scheme we shed the block and either make a play or run
to the ball. - Romeo Bandison
The instant we recognize the
blocking scheme we shed the block and either make a play or run
to the ball. - Romeo Bandison
Between the 2002-2004
season, Boise State ranked in the top 25 at number 12, 15 and 13
in the final collegiate poll. In those three seasons, our defense
has also been in the top 20 in the nation versus the run: #16 -
2002, #11 - 2003, and #10 - 2004.
At Boise State we play a one-gap defense. We take pride in playing
sound run technique. We stress being disciplined, staying in your
gap and working hard. This defensive philosophy has been very successful
for us, especially in the last three seasons.
It is Boise States defensive philosophy to stop the run;
the defensive line must be physical and attack their keys (the offensive
lineman in which they are aligned). We want to move the line of
scrimmage 2 yards back from the original. After we attack our key
we react to the blocking scheme that we get. The instant we recognize
the blocking scheme we shed the block and either make a play or
run to the ball. We emphasize these techniques of defensive line
play:
1. Stance
2. Hand Placement
3. First Step
4. Locking Out
5. Step Sequence
6. Shedding Blocks
We feel if we can master these techniques of defensive line play,
we can be successful. For teaching purposes we try to isolate one
technique and focus on that. However, to practice these techniques
we usually work two of the sections at a time in one drill. As time
goes on we combine the techniques into one or two drills to make
it more similar to a game type situation.
STANCE
We believe sound defensive line run technique starts with a good
balanced stance. A stance that at the snap of the ball has all our
power going in a straight line towards our key. These are the key
points we believe make a good run stance:
A good base - The feet are about shoulder width apart.
Toes and knees are pointed forward, not out.
The hand closest to the key is down and the foot closest
to the key is back - The down hand should be in line with the
foot that is back. We believe that if the down hand is offset inside
the base, it will cause the upper body to be slightly off center
and off the straight line we are trying to create.
The feet should be staggered about heel to toe - The
stagger of the feet depends on the individual.
The up field foot is almost flat on the ground - More
power can be generated if the lineman is not on his toes.
Our back is flat and our butt is slightly up in the air
- The defensive linemans butt should be slightly higher
then the shoulders.
We work on the 3-point stance by repetition. We stand up, set our
base shoulder width apart and set our feet heel to toe. After that
we dont move our feet. Now we put our hand down in line with
the foot. I check their stance and adjust them if I need to. Then
they all stand up and repeat the process alternating stances.
HAND PLACEMENT
When we teach hand placement we emphasize thumbs up and elbows in,
aiming at the bottom of the numbers. Since we play shaded, our outside
hand may end up on the
outside tip of the shoulder of our key. Thats OK as long as
the defensive lineman can control his key. As soon as he has good
hand placement on his key, he locks out and creates separation between
himself and the offensive line. If the defensive lineman cant
get control of his key because of bad hand placement, we teach
him to reset the hands back inside the offensive linemans frame.
When we work on our hand placement we use a 5-man sled. The D-linemen
line up on
the bags on their knees with the hands on the thighs. On the snap
of the ball they explode through the hips and hit the pad with the
thumbs up and elbows in. The hips should be extended all the way
forward and arms are locked out (See Photo 1: 5-Man).
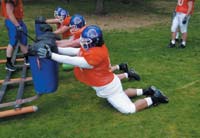
Photo 1: 5-Man |
We also work on hand placement with two players paired up. We start
from a 3-point stance shaded to one side. On the offensive movement
we shoot our hands up aiming for the bottom of the numbers with
our thumbs up and elbows in. At the same time we take a short
power step. In this drill we incorporate hand placement and the first
power step.
FIRST STEP
When the defensive lineman attacks his key the first step is a short
power step. The first step is always with the foot closest to his
key, regardless of what direction his key steps in.
To teach the power step we use the 5-man sled or we pair up. If
we use the sled we line up in a 3-point stance and we alternate
between the left and right. On the snap of the ball we take the
short step and shoot our hands up on the pad. The main coaching
points in this drill are:
1. The short power step
2. Thumbs up and elbows in
3. Flat back
To make the hand placement more realistic pairing up two players
is another option. A defensive lineman just takes the place of the
pad. To save time and to get more reps, we also do it out of a 2-point
stance but we still have the same heel to toe stagger as a 3-point
stance. Just like on the 5-man sled, we work on the short power
step and hand placement.
LOCKING OUT
After the defensive lineman gets off the ball, takes the power step,
and has made contact with good hand placement, he now locks out
his arms. This creates separation between the defensive lineman
and his key, which is crucial. Our goal is to have a clear view
in our gap, control the block, and eliminate the opportunity for
the offense to hold us in order to shed the block to make the tackle.
We work on this by doing our Lock Out drill. We pair
up facing each other and start locked up. The defense grabs the
offensive player with their hands on the numbers. The defensive
player is shaded to the right with his right foot up field. The
defense has their facemask on the offensive players chest.
On my command the defensive line locks out and creates separation.
At the same time they push off of the backside (left) foot keeping
their right foot up (See Photo 2: Lock Out).

Photo 2: Lock Out |
On my second command they shed the block by ripping or swimming.
As soon as they shed the block they break down to finish in a good
football position, ready to make a tackle. Next we do the same thing
on the left side. We can also do this drill from a 3-point stance.
This way we incorporate stance, hand placement, the first step and
the step sequence all in one drill.
THE STEP SEQUENCE
Regardless of stance, after we have taken the first power step,
we adjust our feet in the direction our key steps.
The key goes to the right - The right foot needs to
end up field and the defensive line pushes off the left foot.
The key goes to the left - The left foot needs to
end up field and the defensive line pushes off the right foot.
If we are shaded on the right of the key we are in a left-handed
stance. If the key goes to the right, our first step is the short
power step with the left. Naturally our next step is with the right
so we will have the correct foot up field. We want to keep our feet
in that position. Now we push off the backside foot and lock out
to control the block.
If we are in a left-handed stance and our key goes left, our first
step is with the left. We need our left foot up field and our right
foot back but our next step is with the right foot. The next step
is going to get my feet underneath me. The base is now narrow so
the next step with the left can get my feet back in position. The
left foot is now up and we are pushing off the backside foot. We
lock out to control the block (See Left-Handed Stance Diagram).
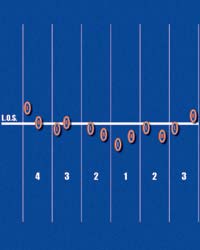
Left Handed Stance |
In our philosophy of footwork, the defensive lineman always steps
with the foot closest to the key first. If he doesnt, he will
automatically cross his feet and turn his hips. His strength is
now going towards the sideline rather then up field.
To practice the step sequence we do our Mirror Drill.
We are paired up facing each other. The defense is in a 2-point
stance with a left or right foot stagger. I will point to the left
or right for the offense. The offense takes one step in the direction
that I point. On the offenses movement the defense shoots
their hands up, takes their power step and then goes through the
step sequence. This should be 3 to 4 steps. In addition to the Mirror
Drill we use the Shiver Sled.
We will start on the left side of the sled in a left-handed 3-point
stance. On the snap of the ball we go through our step sequence
(See Photo 3: Shiver Sled).
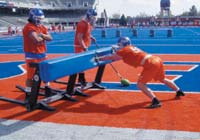
Photo 3: Shiver Sled |
Then we come back to the left, start in a right-handed stance and
go through our step sequence again. We repeat the same thing
on the right side of the sled with the left and right-handed stance.
SHEDDING BLOCKS
We dont want to make arm tackles when the running back comes
through our gap. We want to be able to wrap up and run through the
tackle. The only way we are able to do that is if we shed the block.
We believe shedding the block has to be violent and fast. If it
is not, it gives the offensive line has a chance to grab and hold
us. We teach shedding blocks two different ways.
1. PULL AND SWIM
After we are locked out we pull the offensive lineman towards us
and punch over the top of his shoulder with the backside hand. We
dont want to bring the arm up high.
2. RIP AND SHED
We do this by keeping the play side hand on our key a fraction longer
than the backside hand. Then we rip the linemans hands off
of us with the back side arm. Shedding the block is incorporated
in our Lock Out Drill.
These 6 points of emphasis make up the principles of the defensive
line technique that we teach. We work on these 6 techniques in individual
drills every day. Combined with our defensive philosophy and our
defensive package, it is a very good fit. But every off season we
try to find a way to make it better by evaluating ourselves and
by learning from the many great defensive line coaches and teachers
out there.
|
About the author
Romeo Bandison
Romeo Bandison starts his fifth season as Boise States
Defensive Line Coach this fall. During the last three seasons
the Broncos have been to the Humanitarian, Forth Worth and
Liberty Bowls. Bandison played at the University of Oregon
and received a Bachelor of Science Degree in Economics in
1994.
Questions?
If you have any questions you can email the author at:
rbandison@boisestate.edu
|
| Related Videos |
|
American Football Monthly now offers
a full line of coaching videos. So, if you enjoyed this
clinic article,
here are a few videos that you may find interesting:
FV-2227: Defensive Line Drills and Techniques
for the 3-5-3 (Burks)
FV-000481: Defensive Line (Plumbtree)
FV-00420: Defensive Middle Guard (McBride)
To find these videos and many others,
view our online catalog at www.AFMVideos.com.
|
|


 Digital Download - 304 Pages of Football Forms for the Winning Coach