AMERICAN FOOTBALL MONTHLY THE #1 RESOURCE FOR FOOTBALL COACHES

Article CategoriesAFM Magazine
|
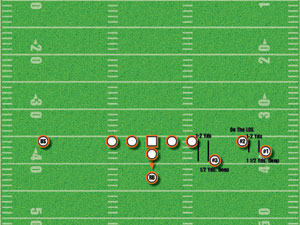
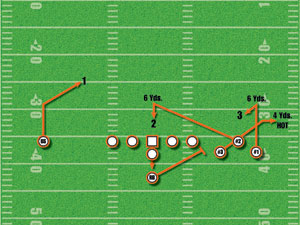
Bunch it Up: Oklahoma State\'s Bunch Passing PackageThe Bunch Package offers a wide variety of plays, advantages and mismatchesby: Gunter Brewer Passing Game Coordinator, Oklahoma State University © More from this issue One of the most intriguing formations that I have seen in recent years is the Bunch Package. This formation offers such a wide variety of plays, advantages and mismatches that force a defense to defend drop back, screens, quick passes, strong side and weak side running game as well as play action. This package causes a defense to reduce to your formation and therefore creates more field space and key blocking angles. By being able to do a wide variety of plays you will be able to take advantage of certain match-ups and misalignments. One thing we try to do with our Bunch Package is incorporate as many of our base plays into that formation. This allows us to spend less time teaching about what bunch causes a defense to work on plays out of multiple formations and gives us another option in play calling. In years past we have also packaged certain Bunch plays in order to attack the team we are facing that week. An example would be: package the toss play with weak side counter and the play action pass. The base rule for the QB would be: 1. Run the toss strong unless outnumbered 2. Run the weak side counter unless outnumbered 3. Run the play action pass if outnumbered or safeties down in the box Formation and splits: A cluster of three players will align approximately two yards apart and one yard for the OT. The inside player will be two yards from the OT and off the LOS one and a half deep. The middle of the three players will be on the ball one to two yards from the inside player. The outside layer will be one to two yards from the middle player and deep enough to have daylight showing between him and OTs hip (See Diagram 1). Diagram 1: Bunch Alignments
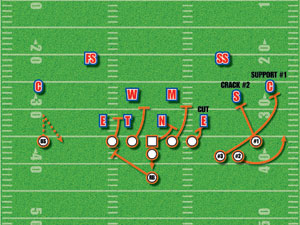
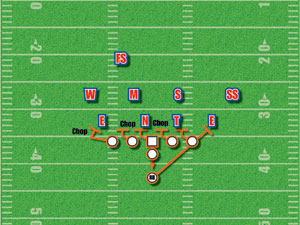
(1)The Boom-Boom Screen The Boom-Boom Screen is a Crack-Arc scheme that enables you to get the ball on the perimeter fast without a lot of blocking schemes. The base rules for this play are simple and you can use motions and different personnel to change things up a bit. The widest receiver to the play is the crack guy; he must crack the number two defender from outside in and seal him to the inside. The middle receiver is the person getting the ball; he must back up at a 45-degree angle and let the lead blocker get in front of him. He then will stretch the defense by gaining width and set up the arc block. The arc blocker is the third man to the play side; he must gain width and try to control the outside pad of number one (counting from outside in). The offensive line will execute a zone-type blocking scheme through their gap and up to LB level. The play side tackle must cut the DE or make sure his hands are down so the QB can make an easy throw. The RB will seal the backside gap away from where we are throwing the ball; that is just off the hip of the offensive tackle. The back side WR away from the ball will take a couple of steps up and then three steps back behind the line of scrimmage which is a dump off for the QB. This can be run from the shotgun as well as under center (See Diagram 2). Diagram 2: The Boom-Boom Screen
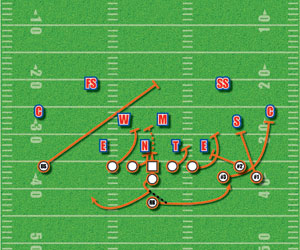
Coaching Points: Wide Receiver to the Call The crack receiver must be under control in order to make the block and seal the defender. You cannot allow penetration. The #2 receiver to the ball must allow the arc blocker to get in from of him in order to make the block and then stretch the field. The #3 receiver to the ball must try to gain leverage by attacking his outside pad in order to stretch him. Be ready to cut if necessary. Running Back Must seal off the tackles hip (it will disappear) Offensive Line Know where the ball is going and use a zone principle to get there. Run and cut the defensive players. Quarterback Execute quick two-step drop if under center or turn and throw if in the shotgun Make an accurate throw to the WRs up field shoulder. Offensive Lineman Slide protect away from call. Eliminate penetration. Adjustments Can tag the slant side with a slant and go, hitch, quick out or fade (QB can signal these at the line). Can tag the hitch with a hitch and go to the Bunch side. Can send the protection away from call (game plan or read blitz) You can read this route strong to weak and reverse the order with the slant being a pure take it read. (2) Spacing Route Green Bay Green Bay is a quick five-step quick pass that is very simple to teach, run and execute. Based out of the bunch formation it can cause some confusion for the defense and end up leaving some large holes to throw the ball. The widest receiver to the play will run a six-yard hitch. Push vertical (slightly outside your alignment) to six yards. Plant and open to the QB. This route does not convert; it is locked. The #2 WR will run a six-yard spot route. Release inside and push up field to six yards directly over the ball. Plant and open to the QB. Create your own space with your body and this route is also locked against all coverage. The #3 WR will run an arrow route. Run a straight line aiming for four yards on the sideline. Get wide as quickly as possible! Stretch the defense in a hurry. You must get your head around for his is the HOT throw for the QB. The backside WR will run a three-step slant. Push for three steps and then cross the DBs face. The WR must settle versus zone coverage and stay on the run versus man coverage. This route is a yes/no read for the QB. If pre-snap coverage shows the route will be open, we will throw the ball here. He will know on his first two steps of his drop. The QB will scan the field starting with the slant and then work across the field (slant, spot, flat, hitch). The arrow is the hot route if blitz is recognized. The running back will block off the edge towards the play side; stay tight to the tackle and block first one through the show off the edge. He must get the mans hands down so the QB can throw the ball. The offensive line will slide protect; the QB will direct them to the most dangerous edge. Every lineman will take a gap and protect that gap in the direction of movement. Eliminate penetration! (See Diagrams 3 and 4). Diagram 3:Green Bay Spacing Route
Diagram 4: Green Bay Slide Protection
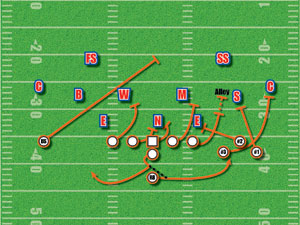
Wide Receiver to the Call The outside runs a hitch (does not convert). Find a window and dont drift. #2 must find a window over the ball. Settle and dont drift. #3 must gain width in a hurry. If blitz, expect ball quickly. Running Back Protect off the hip of the tackle. Take first off edge and get hands down. Quarterback Check slant first and then work to spot the hitch. Arrow is the quick or hot throw. Time to Call Any time you feel you have leverage on the defense and feel you can get outside Adjustments Man to man causes a number of problems might have to check out of it Combo this screen with other runs or passes for best results By getting the ball in the WRs hands on the perimeter, we will always have a chance for a successful play. For us, we consider this an outside run but it goes down as a pass. This play can be run alone but might need to be checked versus certain looks. You can combo this play with another for better results. (3) Run Outside Alley Toss Aligning in a bunch formation can create some very favorable angles for an offense. The alley toss play is one that really takes advantage of those angles. This play is designed to get outside while the defense is sealed in by using a double crack arc-blocking scheme. The outside receiver on the lay side will crack the first defender inside of him regardless of leverage (can be the DE or LB). You can cut here because you are a part of the box. The #2 WR will crack the first defender inside of him regardless of level (can be DE or LB). You can cut here because you are part of the box. The #3 WR (can be an FB/WR or TE) arc-block on the support player outside (usually the CB). Try and reach the outside pad so we stretch the hole. If defender comes across the LOS then you may have to kick him out. You can cut here also. The QB reverse pivots and tosses ball to the RB and then boot fakes. The RB open steps on a flat course, secures toss and stretches the defense to the outside. Find an alley and explode through it. The OL will execute a zone scheme with the FST pulling for the alley player (MLB/Safety). You can vary the rules based on front side tackle and guard being covered or uncovered. If the FST is uncovered he will pull (gain depth to avoid the double crack) and block alley defender. The FSG will zone block and cut in the process. If FST is covered then FST and FSG will switch responsibilities. The C, BSG and BST will run their zone paths and cut in the process. This would be based on personnel that you have and personnel preference (See Diagrams 5 and 6). Diagram 5: Alley Toss (A)
Diagram 6: Alley Toss (B)
Coaching Points Wide Receiver to the call side Outside WR crack / cut on first inside. DO NOT get beat over the top. #2 WR crack / cut on first inside. DO NOT get beat over the top. #3 WR arc for the support player. Stay under control; must secure this block! Running Back Catch the toss! Stretch to the outside and force defense to stretch with you. Read your blocks and find a seam. Quarterback Reverse pivot and give soft toss to the RB. Make sure pitch is caught before you boot out. We can game plan a check off if out-lever- aged or outnumbered to the play side with a weak side run or a different run play side run or a play action pass. Wide Receiver to the backside Hustle across the field looking for a block. Turn back on your man if you cant reach another defender. Offensive Line Puller must gain depth to avoid the double crack. Lock on and maintain your block. Keep eyes on alley defender. Run zone tracks and cut to avoid pursuit. Adjustments Can run out of the gun. Use multiple personnel groups. Using FBs and TEs will help with blocking. Run the same play out of gun with your QB as the ball carrier. You gain an extra blocker with your RB. It is possible to run the halfback pass back to the QB and go with the outside WR. Part II of Bunch It Up to Run and Pass will appear in the February issue of AFM. The specific plays will include the 'Weak Side Run Counter' and the Play Action Sting Route. |

 Digital Download - 304 Pages of Football Forms for the Winning Coach

|
| HOME |
MAGAZINE |
SUBSCRIBE | ONLINE COLUMNISTS | COACHING VIDEOS |
Copyright 2024, AmericanFootballMonthly.com
All Rights Reserved