
Article CategoriesAFM Magazine
|
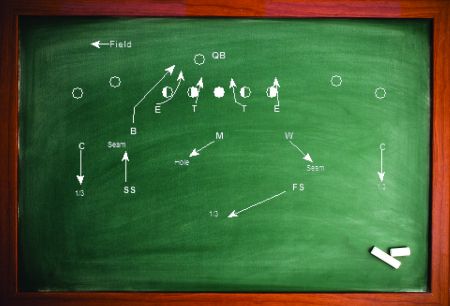
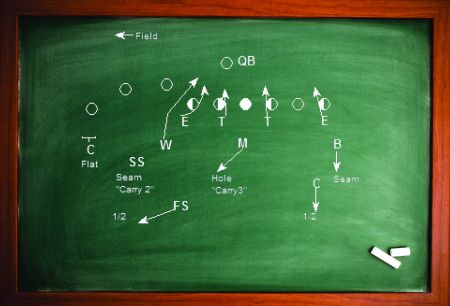
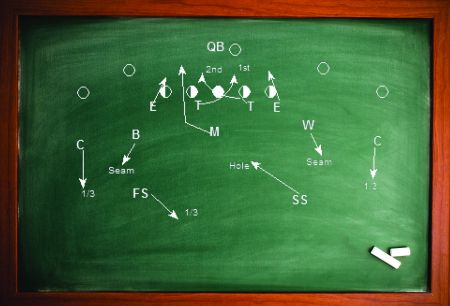
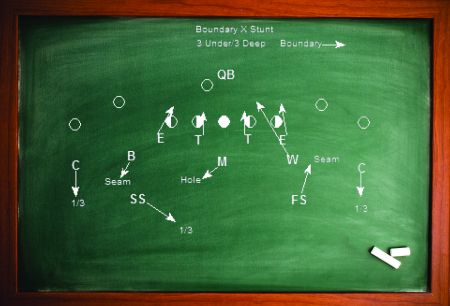
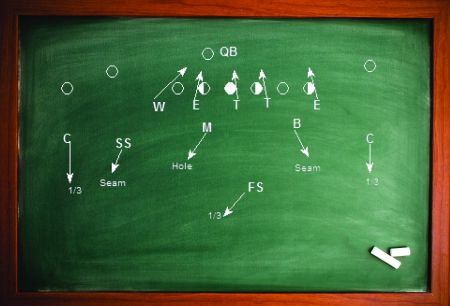
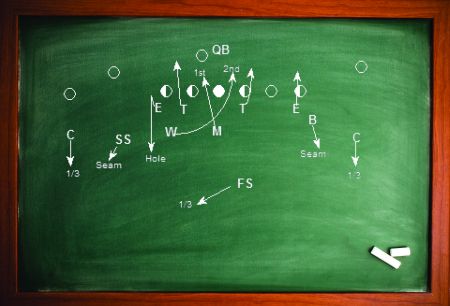
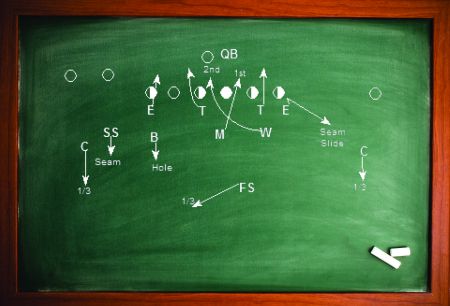
Zone Blitzing the Spread Offense Use this aggressive approach to disrupt routes and timing of the spread.by: Paul DarraghDefensive Coordinator Bloomsburg University © More from this issue Head Coach Danny Hale just completed his 19th season at Bloomsburg and has seen over those years a trend in our opponents offense, a change from the traditional 2-back attack to more of a spread attack. Defensively, we have had to adapt to the ever changing schemes and, along with Secondary Coach Chet Henicle and Defensive Line Coach Bill Perkins, we have developed a scheme that is both effective and easy to understand and one that employs the most basic but also most important aspect of defensive football: aggressiveness! We believe that great defensive football starts with the premise that everything we do, we do with an aggressive, physical nature. Whether it is in the way we attack blocks, or the way we run our stunts, it is always done with the idea that the offense must react to us, not the other way around. We stress Effort, Attitude, and Toughness. We want to EAT every time we step on the field. Our base defense is a 4-3 with a Cover 2 shell. Like a lot of defenses, we try to disguise our intentions. Typically we would zone blitz about 30% of the time. We utilize the fact that 70% of snaps take place on or near the hash mark, so the majority of our blitzes come from the wide side of the field or the boundary (sideline). We can also run the same stunts in the middle of the field but they then become strong or weak-side stunts. The amount of motion and shifting in todays offenses make it very difficult for defenses, regardless of the scheme. We tend to bring outside pressure on the hash and inside pressure in the middle of the field. We have two base zone-blitz coverage concepts: 3 under/3 deep or 4 under/2 deep. Our 4 under/2 deep coverage is typically used vs. a 3 by 1(trips) set with a closed end on the backside. In diagram #1, we are bringing outside pressure vs. a 2 by 2 set and in diagram #2, we are bringing the same pressure but adjust the coverage behind it due to the formation. In diagram #3, we are bringing inside pressure in the middle of the field.
Diagram 1: Field Stunt 3 Under/3 Deep
Diagram 2: Field Stunt 4 Under/2 Deep
Diagram 3: Middle of Field Stunt with Twist 3 Under/3 Deep By design, the safeties know which way to invert by the stunt: field, boundary, or middle. We teach the 3 under/ 3 deep coverage this way:
Diagram 4: Boundary X Stunt
Diagram 5: Boundary Corner Stunt An extremely effective variation that we use in attacking the spread offense is by incorporating a double eagle or bear front. With this we can still play the same two zone blitz coverages and vary the blitzing linebacker. This particular package is very effective at stopping the run and getting pressure on the QB. Diagrams #6 and #7 illustrate two different stunts with coverage depending on the formation. Base rules for the safeties are if 2 by 2 or 3 by 1(open) on the backside, drop to formation strength. If 3 by 1 (closed), then check to 4 under/2 deep.
Diagram 6: Double Eagle Stunt 3 Under/3 Deep
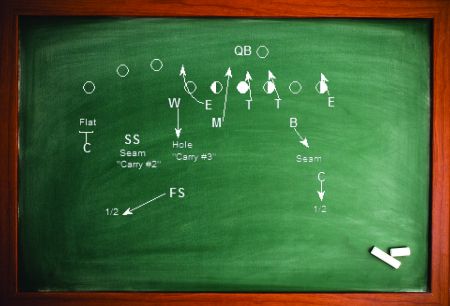
Diagram 7: Double Eagle Stunt 4 Under/2 Deep Lastly, we run an inside cross stunt out of our base 4-3 that, for the most part, will be out of our 3 under/3 deep coverage. This is the only time we pull out our defensive end and have him play either seam or hole. We set a 3 technique away from the TE and he becomes the contain pass rusher to that side. Our Mike and Will cross stunt both A gaps with the Mike going first. Both the double eagle stunts and this cross stunt can be run either on the hash or in the middle of the field and have been a productive addition to our blitz package vs. the spread offense (Diagrams 8 and 9).
Diagram 8: Linebacker Cross Stunt
Diagram 9: Linebacker Cross Stunt As a staff, we feel these zone blitzes give us some flexibility and variety to pressure the spread offensive. We also feel there is some simplicity to the concepts and coaching points that help our players understand the scheme and execute the calls. Hopefully there is helpful information in this article that coaches can use and please feel free to contact myself or any member of our defensive staff with questions regarding this article. Paul Darragh, the Assistant Head Coach, Defensive Coordinator, and Linebackers Coach at Bloomsburg recently completed his 13th season at the school. A three-year starter and captain for Temple, Darragh graduated in 1985, earning All-East honors as an inside linebacker. He began his coaching career at his alma mater and later coached at both Northeastern and Gannon University. Darragh then moved to the DC position at William Patterson College and, before joining the Blooomsburg staff, was the linebackers coach at Indiana University (PA). More Articles on this subject are on the web site: |

 Digital Download - 304 Pages of Football Forms for the Winning Coach

|

| HOME |
MAGAZINE |
SUBSCRIBE | ONLINE COLUMNISTS | COACHING VIDEOS |
Copyright 2024, AmericanFootballMonthly.com
All Rights Reserved