AMERICAN FOOTBALL MONTHLY THE #1 RESOURCE FOR FOOTBALL COACHES

Article CategoriesAFM Magazine
|
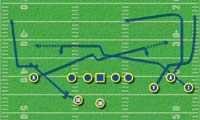
Attacking the Red Zone by AirBunch Routes for the Plus 15 to Plus 10-Yard Lineby: Warren Ruggiero Offensive Coordinator Hofstra University © More from this issue When you get to the 15-yard line your field space for a passing team is really starting to change. The area you have to work with is condensed. Although you are in scoring territory it becomes difficult to score unless you can run the ball. When you get to the 15-yard line your field space for a passing team is really starting to change. The area you have to work with is condensed. Although you are in scoring territory it becomes difficult to score unless you can run the ball. When you throw in this area you become worried about throwing interceptions into zone coverage with small holes or getting sacked because that zone covers you up. When you have to throw in blitz there is just less space to outrun your opponent. Sacks and interceptions are the cardinal sin for the QB down here. You must give your QB some specific throws that he can manage versus blitz and a zone coverage that is operating more aggressively and in less space. This article will discuss two throws that can operate in other field zones; however, they also serve an important purpose between the plus 15 and plus 10 yard line. The first route is our mesh route by both outside receivers. This is a great call versus all coverages. The mesh route can handle the blitz and special zone coverages that will show themselves in this field zone (See Diagram l).
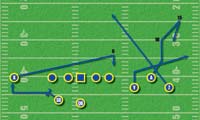
X- Low mesh drive route. Align 6-8 from OT. Tighter vs. 0 blitz. Wider vs. zone. Seam release inside (on a 45 angle while gaining depth) to 7 yards depth and then flatten and run for a spot as if to run over top of the high mesh. As the Z approaches the X will change levels and dip underneath and scrape any man coverage off on the Z. The level change prevents the defender from being able to play in the hip of the receiver and avoiding the rub. If it is blitz he must look quick off the defender and expect the ball. He must then get his eyes to the flat area. If there is no one underneath 10 yards outside the far TE area – or if it is man cover – he will look to the QB immediately after the mesh and stay on the move. If there is a zone cover defender underneath 10 yards in the backside flat then he will keep his eyes on that defender. When the receiver gets to the far tackle area he will burst and sell that he is going hard past the defender in order to widen him and then shut his route down in the far TE area. This burst and widen technique should open up the inside shoulder for the QB. He will square his body and show his eyes to the QB. If the QB throws to his inside shoulder, then he should turn and run there. Z - High mesh drive route. He will push up vertical and slightly inside with his eyes on the defender over him. He will then cut underneath the A receiver who is on the in route. If he feels man coverage he will straighten at the end of his seam release in order to scrape the man defender off on the vertical release of the A receiver. After the Z comes under the point he must go hard for a point 6 yards over the center. He is looking immediately for the defender over the X. If he sees a man cover corner chasing the Z he looks to hit that corner and force him to bubble over the top of the course of the Z. If there is no man chasing the X, the Z will get his attention to the backside flat area and make the same decision the Z did to finish his route on the run or with a burst and sit. A (#2 point man) - In Route. Outside release and look for defender over Z. If the defense puts a defender in press cover on the A, attempting to jam him and disrupt the route, then the A will pick a spot 4 yards outside the defender and run for the spot hard. If he outruns him then he will get vertical and finish his route. If the defender plays hard and cuts the A off, then the A will hit the defender and cut underneath him to get on a vertical system. We do not want the point man to spend a lot of time on the LOS trying to get or set up a release. Pick the spot and go. If the defender over Z is playing the Z man then the A will look to hit the defender on his stem upfield. At 12 yards the A will speed break inside and flatten to catch the ball at 14 yards. At the top of his route he will break over top any walling LB. Usually on our drive series the in route will cover over or under any walling LB. Also, the in route would be able to sit, run or even wheel back outside in order to open himself up. However, on this play he understands that it is the X we are trying to open up and he knows he must go over top the LB in order to open up the X. Even if he has to get bubbled past his depth, he will go over top and he will stay on the move inside. Y - Wheel route. The Z must release third of the three. He will go underneath the Z and will give Z the right of way. After the Y clears outside the bunch he will run hard for the numbers looking for the ball. Without a blitz the ball may come to him on his flat course. If he does not get the ball he will look to wheel outside the numbers and outrun the coverage over top. He still may get the ball at this point. He will never get closer than 6 yards to the sideline. RB - Check release wheel. QB - Isolation with alert read. We categorize all our reads for the QB. We have anywhere from 35 to 50 pass plays in a given year (including all categories 3-step, 5-step, play action, sprint). All these plays fit into one of six categories. These categories allow our QB’s to more easily understand what they are required to do when they learn a new concept. Isolation with alert means that we are attempting to open one receiver with the design of the pass pattern. Alert means that versus a certain defensive look we may throw the ball to a route that we have put in for that purpose. We tell our QB on this play to eyeball the wheel after the snap. This will allow us to hit him and it also pulls the coverage out of the flat on the wheel to open up the area for the Z. If the wheel has tight man coverage with only one safety high then we can alert him for a big play. Otherwise we will check the ball down to the Z. We will take five big steps to let the coverage clear and then bounce once to the wheel and twice to the drive. When we throw the drive we must get our eyes on it as our third step hits and we have decided not to trigger the wheel. If the drive has his eyes on you then you know he is staying on the move and you must lead the receiver out front. If the X does not have his eyes on you then you know that he is going to burst and shut it down. As he bursts, if the defender is outside him then throw the ball on the inside number and lead him up inside away from that defender. Without the blitz, we can hit the flat hot or we can wait for the drive to come off the mesh. This depends on what type of blitz and is tied into our protection. If we throw to the driver versus blitz we must make sure that he gets past the mesh and he gets his eyes around so he can see the ball come of out of your hands. This is a tough throw to find after it has come out of the hand and all the linemen are in the way. The other thing we tell the QB on this play is his degree of aggressiveness. We give the QB an aggressive or conservative tag on many of the plays we have. This puts the mind of the play caller in direct communication to the QB on the field without even having to converse. As soon as a play is called the QB knows if I am thinking to push the ball down the field or to drop it down if he can. So many times there is a gray read on a hi/lo where he could do either. You may want to dictate it. You may need to gain yardage fast; your QB is playing well and you want him to push it – so be aggressive. You may just need to settle things down and get a completion. If your QB needs some confidence, you may just need three yards for a first down – you may want to be conservative. On this play we want the QB to be conservative. We tell him he can hit the wheel if he really has it big versus cover one. Otherwise, when we call this play we are trying to open up the drive and we want to give it to him. This is a great red zone throw, 3rd and medium, coming out, when a completion is needed. If we want to work the in and drive concept hi/lo – we are calling a different play. The other bunch play we are going to talk about is one that we are trying to get the ball in the end zone for the score. This is our ‘Flag Stop’ concept. (See Diagram 2) X - Far spot route. Align 6-8 yards from tackle. Go now for a spot 6 yards deep over the far B gap. When you get to the spot burst and show your eyes and numbers to the QB if you are open. If it is man or you are covered, then sink your hips and return back in the direction you came from, working parallel to the LOS. Understand that you are the third receiver in the progression to get all of your depth and get all the way to the B gap. Do not look early. Z - Seam clear route. Identify near safety pre-snap. Release under the point man. Run at the hook zone LB and then avoid outside. Let him wall you and then get your eyes to the near safety. Cross the face of the near safety if he is a half-quarter player. If he is a third player or a zone player run outside of him and by him to the back edge of the goal line. This is your only chance to score – running out the back edge of the goal line. The ball may come over top or on the back shoulder versus the inside zone player. Your main job is to occupy all defenders who are to play the inside route short or deep out of the bunch.
Y - Flat route. Last receiver in release. Go under Z and aim for 5 yards deep on the outside edge of the numbers. Look for ball quick off mesh then get to finish point, settle and show numbers to QB. RB - check release swing. QB - Area to replace read. Flat is hot versus blitz. Take 5 big steps and a hitch drop. We are trying to get the defense to play the flat snag route that all teams will run. As the corner or safety waits outside the bunch for the flag route to come to him we will put the breaks on and fire the ball to the A receiver on the flag stop just over the goal line. We will put our eyes initially on the flat for the quick throw and to pull the coverage for 3 steps. Then we will feel the curl area that the flag stop is breaking into. We want to throw the flag stop on our hitch. If we feel a defender move into our throwing lane we will replace that player with a throw into his area. If the flat cover gets under it we will throw the flat stationary on the outside edge of the numbers on our hitch. If the hook player comes inside out underneath it we will hitch down to the Z working underneath. We can finish our progression with a second hitch to the RB on the swing. Without a blitz we can convert the far spot to a fade from that same tight split. There are many combinations that can be run off the bunch formation. These two have been plays that we run in the normal field zones that also serve a specific purpose for us between the 10 and 15 yard line – one aggressive and one conservative. |

 Digital Download - 304 Pages of Football Forms for the Winning Coach


|
| HOME |
MAGAZINE |
SUBSCRIBE | ONLINE COLUMNISTS | COACHING VIDEOS |
Copyright 2026, AmericanFootballMonthly.com
All Rights Reserved