AFM RSS Feed Follow Us on Twitter       
AMERICAN FOOTBALL MONTHLY THE #1 RESOURCE FOR FOOTBALL COACHES
ABOUT |  CONTACT |  ADVERTISE |  HELP  


   User Name    Password 
      Password Help


Article Categories


AFM Magazine

AFM Magazine


The 35 Defensive Package Cover 3, Cover 4, and Blitz Packages Part II

by: Matt Welch
Defensive Coordinator • Friends University
© More from this issue

Click for Printer Friendly Version          

In blitz packages, it is critical for the defensive ends to draw blocks to free the blitzing linebackers or defensive backs.

In the last issue of AFM, we discussed our base alignment, gap responsibilities, our gap numbering system, and the receivers’ numbering system. We included diagrams that explained our numbering system vs. the spread, an open twins formation and a pro formation. Secondary coverage vs. these three formations concluded part I. In this issue, our robber coverage and our cover 3 and 4 are discussed as well as specific blitz packages.


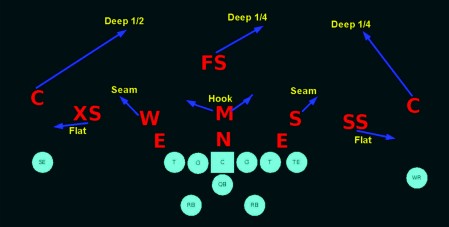
Diagram 1: Cover 4 Secondary vs. Pro Formation.

Cover 4 Secondary Coverage vs. Pro Formation (Diagram 1) - This coverage will allow you to run a three-deep zone but with different responsibilities for the FS and CBs. This alignment gives you a cover 3 look, but at the snap of the ball, the FS will move over to the strong side and play the deep quarter-field in the secondary. The strong side CB will take the other deep quarter while the remaining deep half will be covered by the weakside CB. The safeties - SS on the strong side and XS on the weak side - will cover the flats. The Sam and Will linebackers will handle the seam areas while the Mike takes away the hook zone.


Diagram 2: Cover 4 Secondary Coverage vs. Twins Open

Cover 4 Secondary Coverage vs. Twins Open (Diagram 2) - Coverage is the same as if facing a pro formation. The benefit to cover 4 is that it allows you to run the 3-deep zone with additional emphasis to the strong side by having the FS take the deep quarter and the CB take the other deep quarter. The weakside CB handles the backside deep half. Everything else is the same.


Diagram 3: Cover 3-Man Secondary Coverage vs. Pro Formation.


Cover 3-Man Secondary Coverage vs. Pro Formation (Diagram 3) - This coverage allows you to run man-under with a FS over the top. Both CBs and the FS have deep-third responsibility while the SS and XS have the #1 WRs to their respective sides. Sam takes the TE while Mike and Will take the backs coming out to their sides.


Diagram 4: Cover 3-Man Secondary Coverage vs. Twins Open

Cover 3-Man Secondary Coverage vs. Twins Open (Diagram 4) - This coverage allows you to run man under with a FS over the top. Both CBs and the FS have one third responsibility while the SS and XS have the #1 WRs to their respective sides. Against twins, Sam takes the #2 WR instead of the TE while Mike and Will take the backs coming out of their sides of the backfield.


Diagram 5: 35 Blitz Package vs. Twins Open/ 35 Double Rip

35 Blitz Package vs. Twins Open/ 35 Double Rip (Diagram 5) – In this blitz package, we use “red” or man-to-man coverage to ensure everyone knows exactly who they are responsible for in the event of a pass. In this “double rip blitz”, we send both the Sam and Will LBs through the B-gaps on the snap of the ball. It is critical in all blitz looks that the DEs go hard and try to draw a block to free up the blitzing LBs. Both defensive ends are in their normal alignment (5-technique) and rush upfield. The nose guard and Mike LB are lined up normally as well, but at the snap of the ball, Mike is reading the nose to determine which way to go.

If the nose controls the center and goes hard right, Mike reads that and goes left. In coverage, both CBs have the #1 WRs to their side. The SS has the #2 WR to the strong side. The FS has the #3 receiver (RB) if he goes out on a pass route. The XS takes the #2 (also a RB) to the weak side if he goes out.


Diagram 6: 35 Blitz Package vs. Twins Open/ 35 Blitz Red

35 Blitz Package vs. Twins Open/35 Blitz Red (Diagram 6) – In this blitz, we send all three linebackers – Sam, Will, and Mike – on a double-rip blitz. Mike will tap the nose on the hip to the side he is going and rush that A-gap. The nose will slant hard away from Mike to the other A-gap. Both DEs will line up as 5-techniques and attempt to draw blocks off the offensive tackles. If they go hard and cause this to happen, it will open up holes for the LBs over the B-gaps and enable them to put great pressure on the backfield. In coverage, both corners have the #1 WR to their side. The SS will have the #2 to his side. The FS will have the #3 (RB) if he goes out while the XS takes the #2 (RB, also) to the weak side.


Diagram 7: 35 Blitz Package vs. Twins Open/35 Storm Red

35 Blitz Package vs. Twins Open/ 35 Storm Red (Diagram 7) – This look enables you to send blitz personnel from both sides of the ball. The “Storm” call is for the SS. He lines up in normal fashion on the #2 WR on the strong side and at the snap of the ball, he will blitz outside the C-gap going for the QB. It is critical to coach the SS to always keep his outside shoulder free while on the blitz in order to keep contain, if necessary.

The Will LB is the second man in this blitz attack, shooting the B-gap at the snap of the ball. The DEs play a key role again, driving into the backfield to force the O-line to block them and free up the blitz. The DE on the strong side will cheat down to a 4-technique before the ball is snapped and rip into the B-gap to draw a block from the OT. The weakside DE stays in a 5-technique and rushes upfield through the C-gap and over the outside of the OT.

The nose will control the center and once again the Mike LB reads and goes through the opposite A-gap. The secondary is in ‘Red’ coverage. Both CBs cover the #1 WR on each side. The FS will move over on the snap of the ball and take the #2 WR on the strong side. The Sam LB will take over the #3 receiver if he goes out for a pass. The XS will take the #2 receiver on the weak side.


Diagram 8: 35 Blitz Package vs. Twins Open/ 35 X Red

35 Blitz Package vs. Twins Open/ 35 X Red (Diagram 8) – This blitz is the opposite of the “Storm” blitz. A two-pronged blitz attack is once again used, but this time we will bring the XS and the Sam LB. The XS will blitz from the weak side through the C-gap at the snap of the ball, aiming for the QB. Sam will blitz through the B-gap on the strong side. Both DEs will once again play key roles, rushing hard through the C-gaps. On the strong side, the DE will come hard from a 5-technique position while on the weak side. The DE rushes from a 4-technique. The nose and Mike LB will have the same responsibility as the storm blitz. We also run “Red” coverage on this look, with both CBs taking the #1 receivers on their respective sides. The SS will take the #2 receiver to the strong side with the FS responsible for #3 strong side, if he goes out for a pass. The Willie LB will have #2 if he goes out for a pass.
 
About the Author: Now in his 12th season coaching at Friends University and 29th overall, Matt Welch serves as the team’s defensive coordinator. While at Friends, he has been a part of 10 championship seasons. Welch began his coaching career in 1985 at Southwestern College.

Coach Welch answers your questions on
Facebook - just go to to https://www.facebook.com/AmericanFootballMonthly/

More like this:

Getting Defensive - January, 2014
Confuse the Quarterback, Part II: Disguising Your Blitzes – January, 2014
Blitzing Backs – January, 2013


NEW BOOK!

AFM Videos Streaming Memberships Now Available Digital Download - 304 Pages of Football Forms for the Winning Coach


HOME
MAGAZINE
SUBSCRIBE ONLINE COLUMNISTS COACHING VIDEOS


Copyright 2024, AmericanFootballMonthly.com
All Rights Reserved