
Article CategoriesAFM Magazine
|
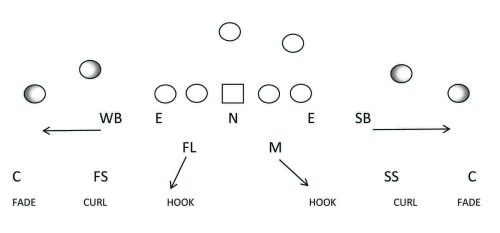
Zone Defense on the Goal Line - To be efficient in this zone defense, give each player a specific responsibility.by: Rey HernandezRetired High School and College Coach © More from this issue As the passing game has evolved over the last few decades, defenses have been challenged in a variety of ways. Defensive coaches have had to try to find ways to maintain some competitive balance in both the red zone and the big red zone. In the 1970�s it was rare to find teams playing zone defense in the red zone. The standard coverage was man-to-man with corners playing on the line of scrimmage with inside leverage. The most common pass in this scenario became the quick fade to the corner of the end zone. As high school quarterbacks became more accurate and the receiver positions became filled with taller and more athletic players, I realized that I had to do something to give our defenders a better chance of succeeding in these situations. During this time, our passing game was a bit ahead of its time. Although we had a very successful program, my motivation to improve our play came not from a lack of success on game day but from my desire to better defend our own receivers in practice. The graduating seniors off our 1981 team had three receivers who earned Pac-10 scholarships and a QB who earned a scholarship to San Diego State. We had some pretty good players on the defensive side and our practices were very competitive. Whenever our receivers would catch a fade in the end zone it was a frustrating experience not so much because they caught the ball and scored but because they caught the ball even though we knew what they were going to throw when they came to the line of scrimmage. A number of factors came under consideration in designing our red zone goal line zone coverage. First, the call had to be one that could be used in specific down and distance situations. In addition, the call had to take into consideration offensive play call constraints such as clock management, down and distance, and time outs. The call also had to be one that we could easily disguise and give the initial appearance that we were still playing man-to-man. Because cover 2 was one of our base calls, we used this coverage and our base 50 front to design our goal line zone call. The major adjustment was a transition from two-deep safety coverage to a quarter safety look that employed match-up zone techniques (Diagram 1).
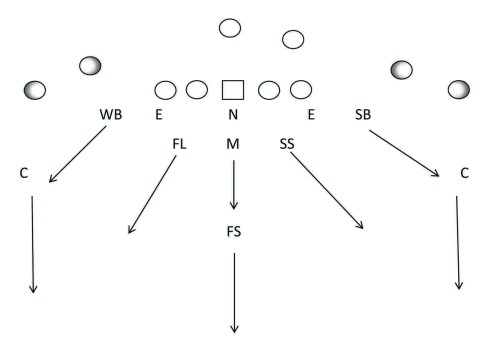
We tried to avoid making this call any deeper than eleven yards from the goal line. Doing so would start to take our defense out of its comfort zone. Beyond the eleven yard line the offense now begins to have more area to vertically stretch the coverage and this could prove to be problematic especially against a team that has exceptional athletes at the skill positions. One of our goals was to shrink the field and keep the offense from stretching the field to their advantage. On the snap of the ball, he will drop to the corner of the end zone to defend against the fade and, if it doesn�t materialize, he defends the corner of the end zone against any receiver that might possibly end up there. This is strictly a true zone read for the corner. His vision is focused on the quarterback and he should see the ball�s release. He is also instructed to not come off his coverage unless a ball carrier is moving toward the goal line with no other defender in a position to tackle him. In cases where the ball carrier is behind the line of scrimmage and can still throw the ball, it is better to attack the runner, force the pass and hope it is dropped or overthrown than to see the ball carrier enter the end zone uncontested. It is important to remind the linebackers that they are not to get any depth on this drop too early. The routes behind them are covered. The slot�s release or the running back�s pass release on the snap of the ball will determine their depth. These two defenders are playing match-up zone techniques as well. Discipline at this position is very critical. During the practice week, we would often bring our linebackers and defensive backs together to work on pattern recognition and combination recognition in a scout setting. It was here where we would try to replicate the different types of pass releases our opponents� were known to employ in the red zone. Their first responsibility is to find out who the first threat to their hook zone is. This will sometimes be a slot receiver or a back out of the backfield but it can also be a tight end. Once this threat is identified, both linebackers will take an aiming point to this receiver�s release. Should the receiver�s release threaten a zone other than his curl area, the inside linebacker will immediately look for crossing routes coming from either side of the formation. We considered the big red zone an area that extended from our 17-yard line to about our 22- yard line. Once again, we wanted to shrink the field and not leave us with too much real estate to cover. The call was used under similar circumstances to those that exist when a goal line zone call was employed closer to the goal line. Offensively, it had to be a high percentage passing down with the same clock management and time out constraints mentioned before. It was once again a call where the offense needed to get into the end zone and had a remote or non-existing possibility of getting a first down. This call was made from what we called our 50 Stack Cover 3 look (Diagram 2).
Diagram 2: Basic 50 Goal Line Stack C-3 Call in the Big Red Zone Unlike the Goal Line Zone call in the red zone, the 50 Goal Line Stack Cover 3 used a three-deep coverage that was complemented by two defenders that would defend the seams between the safeties and the corners. The position-specific responsibilities are as follows: My experience with this call was that it was also a very strong perimeter run call that could be used in a situation where the opponent was not likely to run the ball inside the tackle box. We once used this call in a section championship semi-final contest against a team that was known for running the ball very well. We had had a long night defensively and our opponent had just scored with a few seconds left in the game to close their deficit to 50-49. Their head coach decided to go for the win and attempted a two-point conversion. Running a straight 50 front against this team was not wise in this situation but I had a feeling they would run off-tackle or to the perimeter on a belly keep play. I went on the field and called a goal line zone but I didn�t tell our defensive staff or our head coach. Fortunately we stopped their belly keep play. I also called it on a critical fourth and goal to go call down on our goal line in a section championship quarterfinals game. If we stopped them, we win and if they score, we are eliminated. Our opponent scored on a transcontinental pass to the quarterback and our perfect 10-0 season came to an end. I learned the hard way that there are three specific plays that can hurt you if you aren�t prepared. That�s one. The other two are a halfback pass or a quarterback draw against a team that has a good running quarterback. From that day on, I made it a point to always put the players on notice about these three plays whenever we installed the defense in fall camp. |

 Digital Download - 304 Pages of Football Forms for the Winning Coach


|
| HOME |
MAGAZINE |
SUBSCRIBE | ONLINE COLUMNISTS | COACHING VIDEOS |
Copyright 2025, AmericanFootballMonthly.com
All Rights Reserved