AFM RSS Feed Follow Us on Twitter       
AMERICAN FOOTBALL MONTHLY THE #1 RESOURCE FOR FOOTBALL COACHES
ABOUT |  CONTACT |  ADVERTISE |  HELP  


   User Name    Password 
      Password Help


Article Categories


AFM Magazine

AFM Magazine


Drills Report – No Pads, No Problem: Five Drills to Improve Your Defensive Line Without Using Helmets and Shoulder Pads

by: Ron Cook
Defensive Coordinator, Lumberton HS (NC)
© More from this issue

Click for Printer Friendly Version          

It’s that time of year when coaches are attending clinics and analyzing film from the 2012 season to improve individual and overall team performance. I’ve learned some training season drills that can improve your defensive line play in between strength and conditioning sessions. These are everyday drills that I use to improve get-off reaction, hand speed, separation, leverage, and pass rush without the use of helmets and shoulder pads. Whether you’re training inside during the winter or outside during the spring, these drills can be applied in any place during your training session.


Drill #1: Ball Drop (Diagram 1)

Purpose: To improve reaction time during the first step of get-off with a secondary emphasis on shooting hands to attack a blocker.

Equipment needed: At least two tennis balls or any type of rubber ball, no bigger than the palm of your hand, which provides a good bounce.

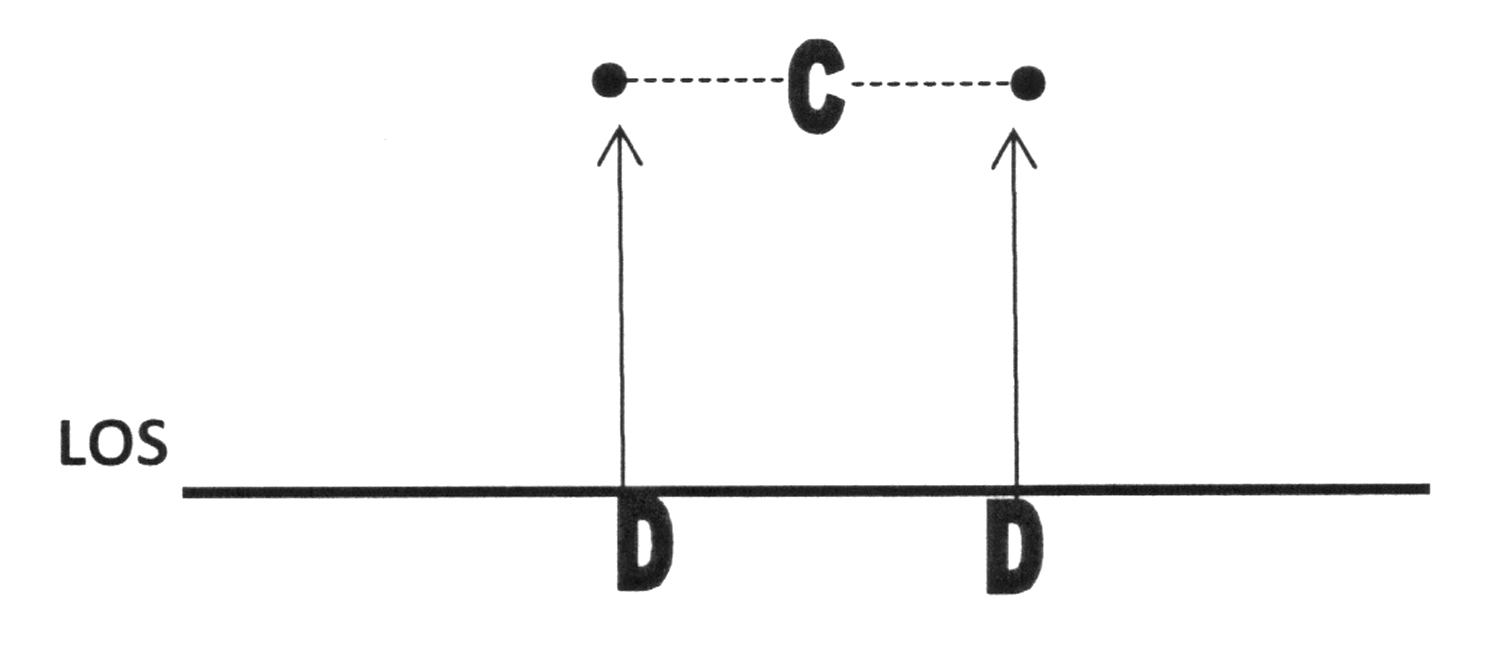
Setting up the drill: Establish a visible line of scrimmage. Separate the defensive line into two single file lines at the line of scrimmage. The coach stands four yards away and in between both lines of players with one tennis ball in each hand.

Executing the drill: Standing at four yards away, the coach will extend both of his arms out to the side at shoulder height with a ball in each hand. The two defensive linemen who are ready to go will get into a three-point stance, crowding the line of scrimmage. Each player will be lined up directly in front of the coach’s left and right hand. Both players will key the hand directly in front of them and when the coach opens his hands to drop the balls, both players will fire out of their stances. After firing out, each player must shoot their hands on air, locking out the elbows and catch the ball after one bounce.

Reps: Each player will get at least two reps from the left and right sides. You can also turn it into a competition and set up defensive tackles vs. defensive ends.

Coaching Point: Continue to emphasize a good first step and a flat back for pad level. The way I teach a good first step to my defensive line is by telling them that their first step should always replace the down hand (same hand, same foot concept). If pad level becomes too high, start dropping the balls a little closer to the surface. As this improves, back up a yard. If outside on grass, use the track if available or push the balls to the grass instead of just dropping them.


Drill #2: 3 Shield Hand Violence (Diagram 2)

Purpose: To improve hand speed from the ground and locking out an opponent.

Equipment needed: Three hand shields.

Setting up the drill: Have three players hold one shield each. One defensive lineman will line up on all fours in a six-point stance with fingers touching the ground. The players holding the shields will line up directly in front of the defender in the shape of a triangle, two shields side by side and slightly turned in toward the defender. The third shield is centered directly behind the front two.  

Executing the drill: The coach designates which one of the players with the first two shields will start the drill. On the coach’s signal, the player designated to begin the drill will quickly step toward the defender with his shield. The defender must shoot his hands from the ground as quickly as possible and lock out the pad and return his hands to the ground directly afterwards. The player holding the shield will slide off to the side and the second player holding the next shield will quickly step toward the defender in the same way the first player did. The defender repeats the same action with his hands. Finally, the player holding the third shield will step straight ahead toward the defender and the defender will finish the drill by fully locking out the pad with a flat back and eyes up.  

Reps: Depending on time, each player will get one to two reps.

Coaching Point: Eyes, head, and thumbs up every time the defender shoots his hands and locks out the pads. Hands should quickly recoil after each strike and fingers go back to the ground before striking the next pad. On the last pad, the defender should never allow his body to touch the ground while locking out.


Drill #3: Wipe Drill (Diagram 3)

Purpose: To teach defensive linemen how to regain leverage from a defeated position and escape the blocker when the ball is more than two gaps away.

Equipment needed: None

Setting up the drill: Split the players up into two lines, one offense and one defense. The players will partner up and run the drill one group at a time. The side designated as the defense will get into a “fit” position (eyes and thumbs up, grabbing the V of the neck with bent elbows and knees) with the blocker. The blocker will grab the defender on his shoulders and place his head on the shoulder of the defender in the direction they are going. If the defender is going left, then the blocker’s head is on the defender’s left shoulder.

Executing the drill: Each defender will start out going left. On the coach’s command, the blocker will sprint laterally to his right and do his best to reach or cut off the defender. The defender must immediately lock out the blocker and push with his left hand. Once the defender locks out and gets his face to the left, he will execute a wipe by taking his right hand off the blocker and use the inside of his forearm to come across the wrists of the blocker as hard and quick as possible. His goal is to knock his hands off and to get the defender’s shoulders and momentum finishing in the direction of the ball carrier. 

Reps: One going to the left and one going to the right.

Coaching Point: The blocker must hold the defender tightly and not just let go when the wipe is executed but make him work. The wipe cannot be executed until the defender has locked out the blocker. Keep good pad level.


Drill #4: Base & Steer (Diagram 4)

Purpose: Teach understanding of feeling leverage, leverage change, and to regain leverage. 

Equipment needed: None.

Setting up the drill: Players partner up and coach decides which side is defense. The coach will stand behind the defense so that the blockers can see him. I usually let at least two pairs go at the same time.

Executing the drill: The defenders are in the “fit” position and the blockers have their hands on the defender’s shoulders while being able to see the coach. On the whistle, I will point left or right and the blockers will begin blocking their defender in that direction. The defender must lock out the blocker and regain leverage by getting the blocker’s shoulders turned. I will blow the whistle to stop them where they stand. I will blow the whistle and point in the opposite or same direction to get them started again.  

Reps: Three to four reps at one time.

Coaching Point: Keep good pad level. I still stress the first step in this drill and do not allow my defensive line to shuffle; we want to always create a new LOS. On the last rep, I will give two quick whistles that tell them to rip and escape the block.


Drill #5: Tag Drill (Diagram 5)

Purpose: Emphasize get off, aiming point, pad level, and bending towards the quarterback in pass rush.

Equipment needed: Four cones, four tennis balls or four towels.

Setting up the drill: Establish a line of scrimmage as a starting point for the defenders. Place each cone four yards behind the LOS. Place each towel or tennis ball slightly behind and to the right of each cone. Each player will line up at the LOS to the left of the cone. Another player will line up as an offensive lineman opposite the defender.

Executing the drill: On the coach’s command, the offensive player will kick step or backpedal toward the cone as fast as he can. The defender must get off with low pad level and beat the blocker to the cone. The defender must be able to dip his right shoulder and pick up the towel or tennis ball behind the cone.

Reps: Two left side and two right side.

Coaching Point: I will break this drill down into stages. Stage #1: just use cones and towels, no blocker. Stage #2:  use cones, towels, blockers. Stage #3: just have blockers going straight back.

About the Author: Ron Cook is now the new Defensive Coordinator at Lumberton High School (NC). He previously was the DC at nearby Red Springs High School. Cook has 11 years of experience as a coach, spending six seasons on the college level. He has also coached at both Montclair State and American International College. Cook played collegiately at both Virginia Tech and Delaware.


NEW BOOK!

AFM Videos Streaming Memberships Now Available Digital Download - 304 Pages of Football Forms for the Winning Coach


HOME
MAGAZINE
SUBSCRIBE ONLINE COLUMNISTS COACHING VIDEOS


Copyright 2024, AmericanFootballMonthly.com
All Rights Reserved