Zoned Out – Stop the zone read cold with Steve Specht’s “Read Scheme”
by: JohnAllen SnyderOffensive Coordinator Pequea Valley High School (PA)©
More from this issue
It’s a simple play, but it can give defenses fits. The zone read, or read option run out of the spread, pistol or shotgun, is being used by dozens of high-powered college offenses and hundreds of high school programs. If you haven’t encountered it yet, you probably will very soon.
To help you prepare for the zone read and learn how to shut it down, AFM turned to one of the nation’s most honored and successful high school coaches – Steve Specht of St. Xavier High School in Cincinnati. Now in his 10th year as head coach of his alma mater, Specht has compiled a 86-27 record that includes two state championships in Ohio’s ultra-competitive Division I. The recipient of the prestigious 2012 Don Shula NFL High School Coach of the Year award and multiple Ohio Coach of the Year honors, Specht is a defensive-minded head coach who has served as defensive coordinator of USA Football’s Under-19 National Team.
Specht’s 3-3-5 defensive alignment and “read scheme” strategy to shut down the zone read can be useful for any defense faced with stopping the read option.
AFM: What general defensive philosophy do you use at St. Xavier?
We are an odd stack team (3-3-5), not a 3-5-3 team. Our philosophy in the box is to employ read scheme techniques and behind that go five across in the secondary to disguise our coverages. We will do a lot of moving in the secondary in and out of different coverages. We will still stunt and blitz when we want to but, unlike the 3-5-3 that is predicated on pressure, we are a “fit” team. Our goal is to fit each gap with a defender in order to be sound across the board (Diagram 1).
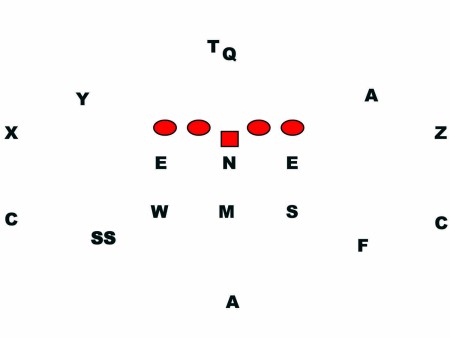
Diagram 1: Basic Defensive Alignment
AFM: How do you employ your philosophy for the different defensive positions?
When talking about individual positions, let’s start up front. Noses are our pluggers; they are big gap to gap guys that can keep the guards off our linebackers as much as possible. They must be physical players who can take on double teams more often than not. The defensive ends we are looking for are long bodies. Obviously, if we get a kid who ends up being 6’4, 270 lbs., we are going to be very happy, but typically we are looking for a long body around 6’2” who can contain rush, play with great leverage, and has speed.
At the next level, our Mike is a true middle linebacker. He plays tackle to tackle and is concerned mostly with stopping the run. He must be physical and have a low center of gravity because offensive guards have angles on him already. Our Sam and Will linebackers are a bit more specialized than the Mike. In Sam, we are looking for a bigger athlete who can bring on pressures often. This is our go-to guy when we want to get into our four-man pressure situations. The Will is the other side of the coin from the Sam. He is a cover linebacker and, based on personnel, we will move him around in order to put him in the best position cover-wise.
In the secondary, we like to go five across in order to help us disguise our coverages. Our corners are cover guys. We want players that can play loose man coverage and eliminate that #1 receiver from the offensive package. Our strong and free safeties are going to be our fastest guys because they are going to be covering the most ground. Finally, our middle safety or our adjuster as we call him, is our most complete player and athlete. He can come up in run support, be a great tackler and then, on the next play, drop back and defend the pass.
AFM: When defending the zone read, what specific methods do you use?
We teach this from day one and it’s how we stop the zone read – it’s called a read scheme (Diagram 2A). It is a technique used by our down linemen (DEs) and the stacked linebackers over the top of them (S/W). Just as, offensively, the goal of the zone read is to “read” a defender and give or pull off of him, defensively we want to always move the read around in order to confuse the offense and, more specifically, the quarterback. We know the C gap player is the QB’s read so we are going to make him simply responsible for the quarterback. The B gap player is the back chaser. This makes the read very difficult for the quarterback when we start moving around and switch the player who is responsible for the B and C gaps (Diagram 2B). We can further add confusion by bringing safeties off the edge and now they become our C gap players and the DEs/LBs are free to work the B gap and chase the back (Diagram 3). In all, we have four different players assigned to two offensive players. That’s putting the odds in our favor and that’s exactly what we want (Diagram 4).
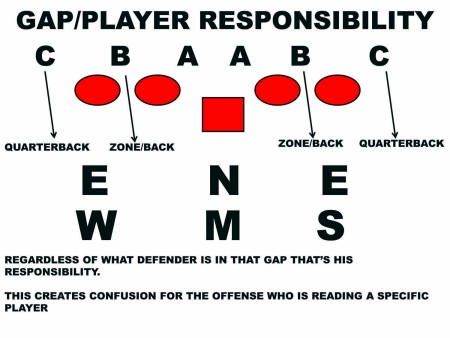
Diagram 2A: Gap/Player Responsibility
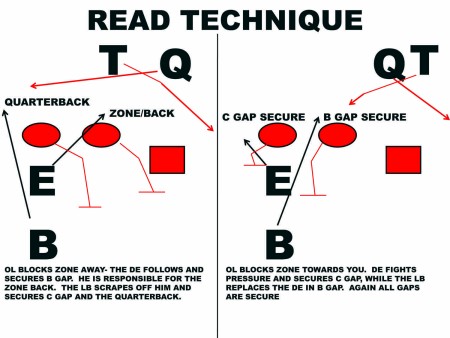
Diagram 2B: Read Technique
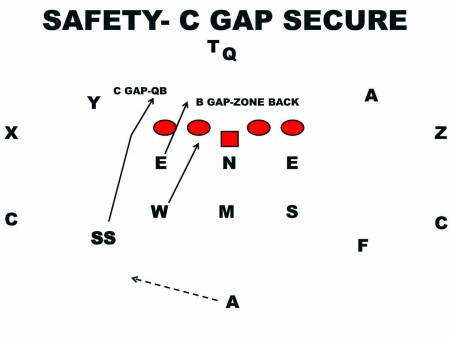
Diagram 3: Safety - C Gap Secure
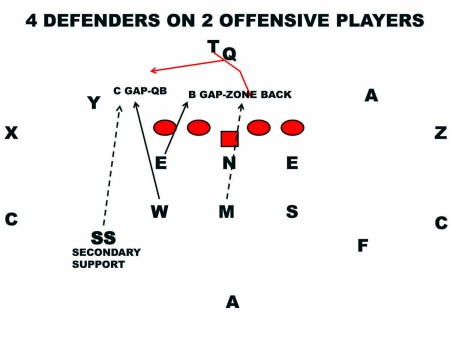
Diagram 4: 4 Defenders on 2 Offensive Players
AFM: How do position responsibilities change when defending the zone read?
This is dependent upon the front called. Ideally, we want to break our front into two sides. One is a read side (where our read scheme is implemented) and the other is the stunt side (Diagram 5). This stunt side is where we will slant the DE and replace gap wise with the LBs or we may bring pressure from this side while keeping the read scheme intact on the other side.
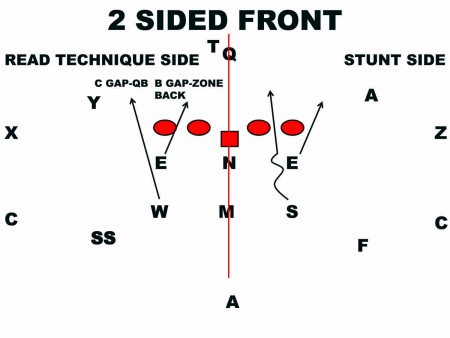
Diagram 5: 2 Sided Front
AFM: How do you prepare to stop play-action passes off the zone read?
Much of how we play the play-action vs. the run game is predicated on formation. We are primarily a three-deep zone team with a twist (Diagram 6A). The twist is that we want our corners to eliminate the #1 receivers, thereby making it a 9-on-9 game. We have effectively removed their two outside #1 threats.
Our philosophy with the remaining 9 players is to overlap the coverages so everyone is covered and has help. Our Mike has the shallow hole over the center about 10-15 yards straight back. The Sam and the Will have hook/curl responsibilities and will rally up to the grass if a team wants to throw into the flats. That’s fine. I will give up the flat all day and rally to it. The offense has to prove that they can and will consistently throw it, complete it and gain yardage for me to really worry about that area. Our safeties will read the #2 and #3 receivers now vs. play-action but will slow play this so that they can still recover and get back to coverage or rally up and give run support. Our adjuster or middle safety is our centerfielder who can get to anywhere he needs to (Diagram 6B).
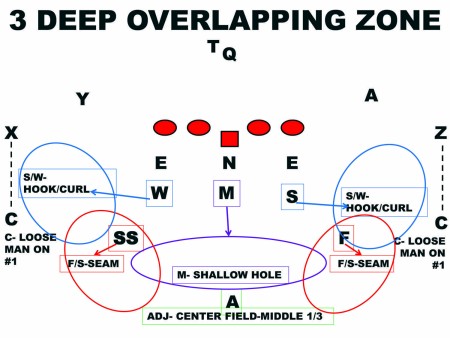
Diagram 6A: 3 Deep Overlapping Zone
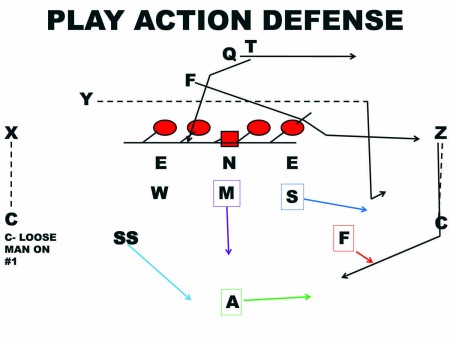
Diagram 6B: Play Action Defense
AFM: Considering your odd-stack alignment, is it more difficult for you to defend against screens?
This is another nice thing about keeping the box intact and having five over the top. We can play screens very well from our base alignment. If our guys read screen, we have a number of players in the box that can rally to the screen while others pressure the QB. We can easily create chaos with a few little wrinkles as well. One thing we can do is bring edge pressure. Not only are we bringing pressure but we are using an athlete to do it. This safety-type player ideally can redirect if need be and minimize the play effectively (Diagram 7A). Another thing we can do is have an “exit” call in which, if our front sees pass set and we are bringing pressure, the nose can loop around the pressure often putting him right in the path of the screen that is trying to suck people toward the QB (Diagram 7B). Finally, we can simply spy the nose to mirror a back out of the backfield on a back screen. At the least, this will force the back to go in only one direction or cut back into the teeth of the defense (Diagram 7C).
https://www.americanfootballmonthly.com/Subaccess/Magazine/2013/June/images/StXavier_02A.jpg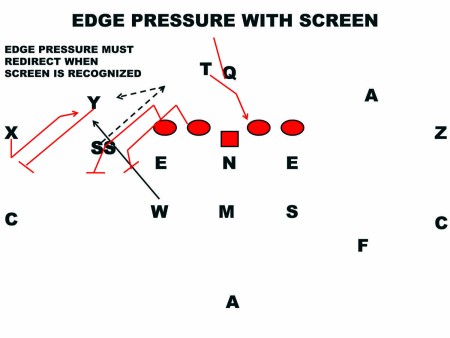
Diagram 7A: Edge Pressure with Screen
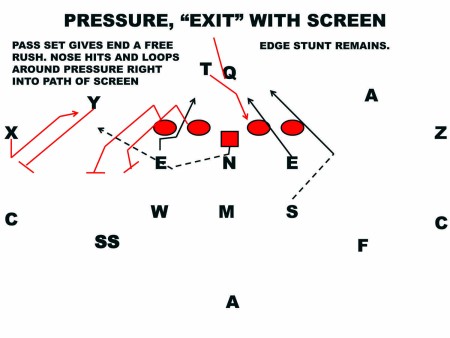
Diagram 7B: Pressure, “Exit” with Screen
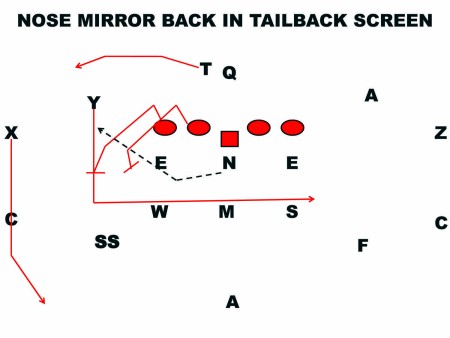
Diagram 7C: Nose Mirror Back in Tailback Screen
AFM: When you encounter motion, what adjustments do you need to make?
Motioning doesn’t bother me or the defense at all. We just adjust the alignment of three of our guys (middle safety, linebacker, and free/strong safety) and only one guy has to make the call (middle safety). This is one of the first things that we install. If they motion from a 2x2 set to 3x1 for example, our adjuster will make the call to sling the coverage. This moves him over #3, and now the backside safety will replace the adjuster in centerfield, and the backside linebacker (Will) will now have the backside seam under #1 (Diagram 8A). This allows us to keep the box intact to stop the run and cover effectively all zones and still overlap our responsibilities.
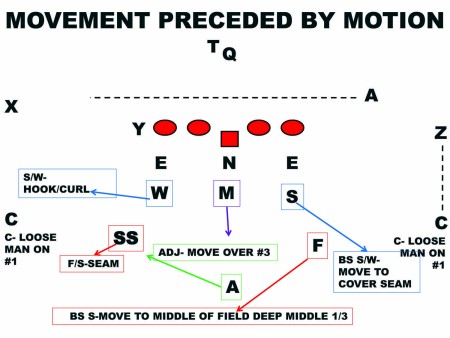
Diagram 8A: Movement Preceded by Motion
Now when a team goes to an unbalanced formation, that can be tricky. We always want to keep the box intact. I don’t like to move guys over, move the adjuster over a new guy, or anything like that. If anything, we will bring a safety down over the unbalanced man to “hover” at 2x2 in order to keep our guys in their same alignment and to also keep the read scheme intact (Diagram 8B).

Diagram 8B: Unbalanced Alignment
AFM: What adjustments will you make if a team is having success with the zone read against your defense?
It really depends on where they’re having success. Is a team beating us with the tailback and zone game? Or is it the quarterback who is having success against us? It really depends on that. Let’s go zone first. The simple solution, if a team is beating us by running the zone, then we want to put another guy in the box. We can do this a couple of different ways. We can bring someone up off the edge and allow our DE/LB tandem to focus solely on the back. Another way we can do this is to bring a safety into the box or the B gap (Diagram 9A). Both of these work very well for us in stopping the zone read. Now let’s flip the script and look at it from the view that the QB is hurting us. We basically run the same concept except now the focus is on the QB. We can have the tandem DE/LB work the QB and bring a safety into the B gap to cover the zone. Our goal is to get a bonus player into the area where we are being hurt (Diagram 9B).
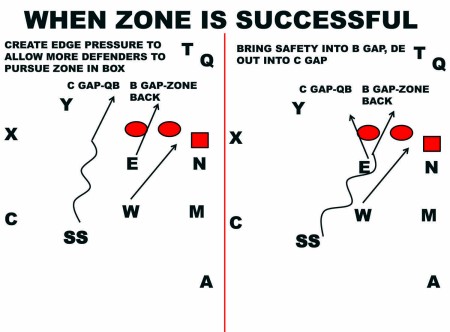
Diagram 9A: When Zone is Successful
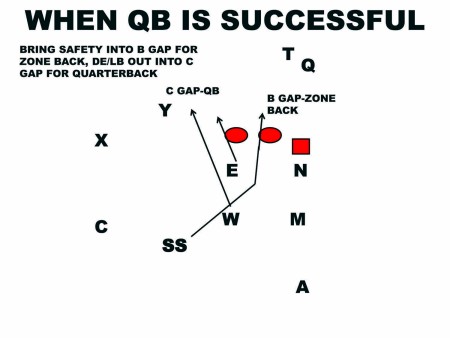
Diagram 9B: When QB is Successful
AFM: How do you defend a package play? For example, how do you cover and stop the zone read when it’s packaged with the bubble?
We don’t change a thing. Our philosophy in passing situations dictates that we don’t worry about the bubble. If the offense throws the bubble to beat us, they are going to have to throw it a ton and it’s going to have to be a consistently big play for them. We aren’t worried about that. We will rally up to the grass on the bubble and make the tackle. Until they hurt us there, we will play it the same as our regular zone read defense.
AFM: What do you differently, if anything, when a team gets in the red zone?
If we do anything different, it’s going to be bringing pressure. Our coverage will tighten and more man-to-man concepts will be employed, but our rules stay the same. When we played Braxton Miller in the playoffs a few years ago, he was so good we felt we had to put a bonus player on him, especially in the red zone with his ability to run and use his feet. We put in what we call a “sniper” or a player that is usually the adjuster who locks on to him and mirrors him at all times (Diagram 10).
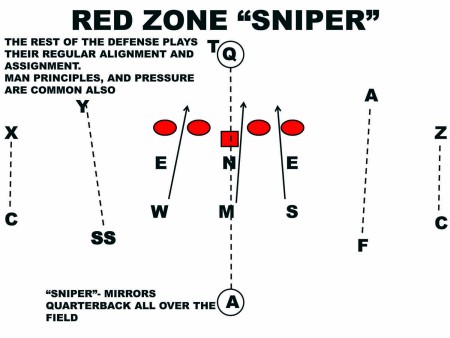
Diagram 10: Red Zone “Sniper”


 Digital Download - 304 Pages of Football Forms for the Winning Coach

