Red Zone Rescue – Using a separate red zone offensive package can confuse the defense.
by: Mike McDanielsRetired High School Coach©
More from this issue
Too often, teams drive the length of the field and get bogged down inside the red zone. For this reason, we adjusted our philosophy and decided to give our opponent a totally new offensive package in the red zone. Inside the 10-yard line, we utilize a four-play, no-huddle sequence of plays which does not give the defense time to adjust unless they use a time out.
Once inside the red zone, we immediately get to the ball, set, and execute the first play. No matter where the ball is placed, we stick with the four plays in a specific order. We make sure that the entire team is set and always go on a silent count.
Each week we work on a specific group of four plays which can be used at any time but are normally exclusive to the red zone. To begin this no-huddle series, we use our “Heavy Right” formation. This positions both offensive tackles, a tight end on the LOS, and a flanker on the strong side. We also use an additional tight end in the slot to the strong side for additional blocking. On the opposite side, we place both guards and the split end. The QB can be under center or in the shotgun. We generally use him in the gun with the halfback positioned opposite the strength of the set (Diagram 1).
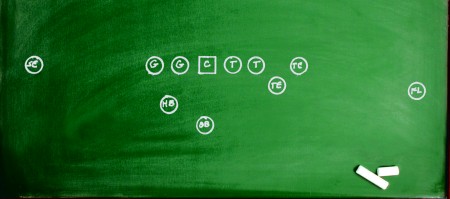
Diagram 1: Heavy Right Formation
The first play in this sequence is “Heavy Right Give.” All down linemen reach or zone block in the direction of the play call. The TE on the LOS blocks to his inside and the TE in the slot blocks the first man on the LOS to the other TE’s outside in a cross blocking technique. On the snap, the QB will give a direct hand off to the halfback. Both split receivers will block the safeties or the OLB to their side (Diagram 2). Once the play has ended and, if we have not scored, we will flip the formation over to the left, get set, and execute the “Heavy Left Give” play (Diagram 3).

Diagram 2: Heavy Right Give
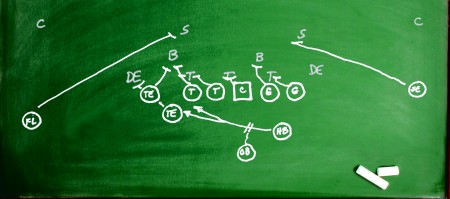
Diagram 3: Heavy Left Give
The third play in sequence uses a trap block from our TE in the slot. The play is called, “Heavy Right T-Bone.” All blocking will remain the same as that used in “Heavy Right Give.” The TE in the slot, however, will execute a trap block to his left. The backfield action will remain the same except that the QB will fake a hand-off to the HB and follow the lead block of the trapping TE. The faking HB will now fill the hole left by the trapping TE (Diagram 4). If we still haven’t scored, we will flip the formation over to the left and execute a “Heavy Left T-Bone” (Diagram 5).
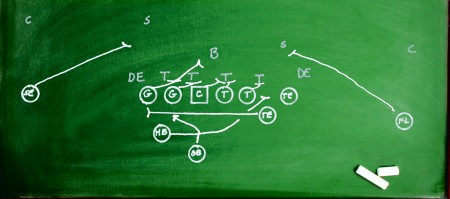
Diagram 4: Heavy Right T-Bone
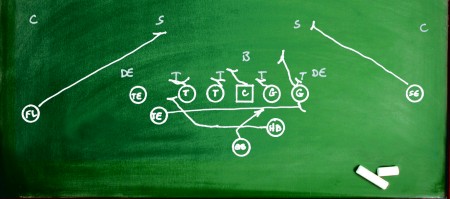
Diagram 5: Heavy Left T-Bone
In the event that our opponent calls a time out during the red zone sequence, we’ll have an opportunity to re-evaluate our thinking. The choice can then be made to stay with the “Heavy” series or change to our “Hulk” series. The major difference between the two series is the utilization of another offensive tackle to replace the TE in the slot (Diagram 6). This formation will definitely stretch the defensive front and leave natural holes uncovered in the defensive line before the ball is snapped.
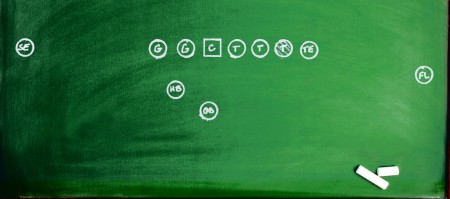
Diagram 6: Hulk Right
If we have decided to switch to the “Hulk Right or Left T-Bone”, we will use a long trap from an offensive tackle. The backfield action remains the same. However, the QB has to ride the fake with the HB longer in order for our trapping tackle to get to the trapping point. Again, the HB will continue to fill the hole left by the trap blocker. To illustrate this, we call “Hulk Right T-Bone” (Diagram 7).
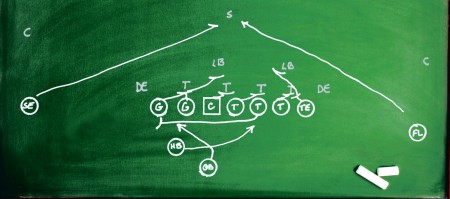
Diagram 7: Hulk Right T-Bone
We do have several pass routes that can be used while we are in this sequence of plays. We can make them as simple or complicated as we want. However, utilizing T-bone protection gives us the best action as well as the best blocking potential. You have both playside and backside protection.
To demonstrate a base play, we call “Heavy Right T-Bone Y Delay Shoot.” During this play, all action remains the same. The TE (Y) will simulate his down blocking, make contact with a defender and release into the secondary (Diagram 8). This simple sequence of plays can be used anywhere or anytime on the field. The no-huddle series also gives us a huge advantage against opponents who flip-flop their defensive front seven according to the position of the formation. Each week we have always added a new wrinkle to our red zone offense. We always try to put our opponent in a situation they are not prepared to defend.
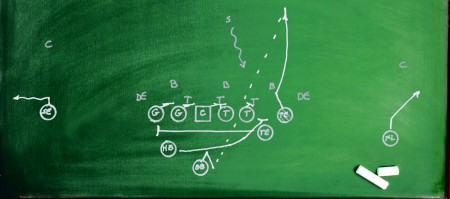
Diagram 8: Heavy Right T-Bone Y Delay Shoot
This sequence is fun to execute and provides great versatility to our overall offense. We can easily switch from the “Heavy” formation to the “Hulk” formation by rotating players. By implementing a passing game, we have greater offensive versatility with this simple sequence of two plays. We then have the ability to rescue our team in the red zone.
About the author: Mike McDaniels has coached in both Wisconsin and Illinois for the past 22 years with an overall coaching record of 72-48. He has had two books published – “Winning Football with a Modern Passing Attack” and “The Pro 3-4: Winning Football with a Multi-Purpose Defense.” He is currently teaching at Auburn High School in Rockford, Illinois.


 Digital Download - 304 Pages of Football Forms for the Winning Coach

