
Article CategoriesAFM Magazine
|
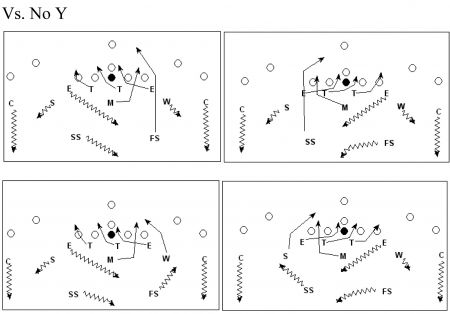
When and Why to Zone Blitzby: Shaun WeaverDefensive Coordinator and Linebackers Coach, Gettysburg College © More from this issue There are many types of zone blitzes. For this article, the focus will be on the 3 under, 3- deep zone blitz scheme that is widely used across at all levels. When looking at zone blitzing, you must first decide your philosophy on pressure vs. both the run and pass game. These blitzes can be equally effective in attacking the run and pass. An effective zone blitz package will use any second or third-level player as part of the pressure options. At Gettysburg, we have calls that allow both 5-and 6-man pressures with the 3-under, 3-deep coverage behind the pressure. In a 6-man concept, a DE or DT must drop out to an underneath coverage responsibility when pass shows. When to use the zone blitz is always a vital question in your defensive game plan. You must first break your blitzes into run and pass blitzes. Be specific to what you are attacking with each pressure. This allows you to become more aware when to use each blitz. In designing zone blitzes vs. the run game, you need to look at overall tendencies of the running attack. First analyze where they attack with their base running plays. You can get great tendencies by field or boundary side or by the open or tight end side of a formation. Then, look at the teams formations to show where they attack in each formation and each running scheme. Once you have this information collected, then select your zone blitzes to attack the schematic weak point of both the play and the point of attack of the formation. This allows you a great advantage to out-number teams in the running game at the point of attack in an aggressive fashion. When to pressure then connects directly to all of your down and distance tendencies you find through film study. Many offenses will have tendencies on when (by down or down and distance) and where they are going to attack. This allows you to be the aggressor and use the information you have to put your players in the best position to make a play. Most run blitzes can then be categorized by down and distance blocks like first and 10 or second and long blitzes. Blitz calls that overlap in multiple down and distance blocks then become a higher priority in your play calling. Both 5-or 6-man zone blitzes can be very effective against most running attacks. Zone blitzing can see even more success when attacking pass protections. Film study of a teams pass protections can show exactly where to attack. First, understanding what protections a team uses, especially by formation or type of pass, will lead you to your proper zone blitzes. Once you identify a teams pass protection (4 man slide, 5 man slide, big on big, etc.) the first person chosen to attack in the protection is the RB. Many times the RB has multiple reads to make before the decision is made to release into their route. If you attack the RB and his rules in the protection scheme, you can be very effective. We teach that the blitz must take no more than 2-2.5 seconds to disrupt or make a play on the QB. We want the ball out or the QB scrambling or on his back in that amount of time. By pinpointing the RB, who in most cases is the weakest pass protector, you can make him make a poor decision or have a great blitz match-up he cannot physically handle. We also look at attacking sides of protections as well with zone blitzes. This allows us to force the man or zone side of a protection to have multiple movements and second or third level players to handle a zone blitz with a full sprint. The same principles used to attack the run game are used with the pass game. Finding out by formation and pass type what protections you are going to see helps you choose the proper zone blitz. The down and distance blocks make it more clear what blitz to select at the proper time. Many times you can collect enough information from film study to find a great blitz to attack long yardage situations and still play a safe 3-deep coverage behind it. The 6-man zone blitzes are applicable to numerous defensive schemes (4-3/4-4/4-2-5/3-4/3-3). You will notice in the accompanying diagrams that there are weak and strong examples of each blitz and variations of them (See diagrams 1-16). The safety version of each blitz is also shown. Where you attack with these blitzes and who physically blitzes can be dictated by numerous calls within your defense. In most schemes, you should have ways to attack from:
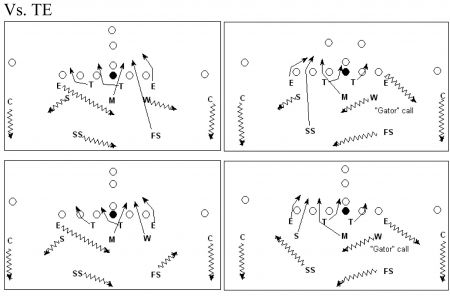
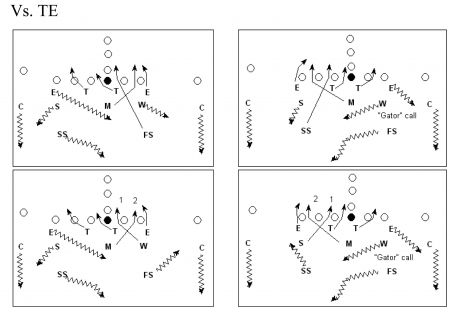
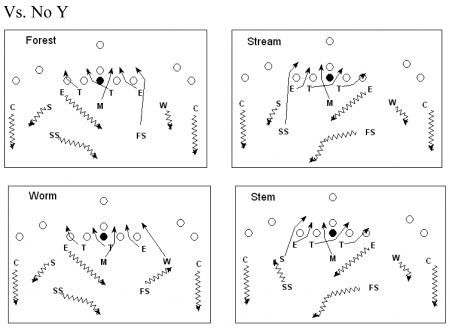
Safeties are the key to making this package work. The safeties are your replacers of the blitzers and they must be able to execute any of the 3 underneath techniques. There are many ways to teach the underneath coverage in a 3 under 3 deep scheme. The most common way is teaching 2 underneath techniques and deep thirds: Diagram 1: Vs. Tight End - Falcon Diagram 2: Vs. Tight End - Soar Diagram 3: Vs. Tight End - Wham Diagram 4: Vs. Tight End - Smash Diagram 5: Vs. No Y - Falcon Diagram 6: Vs. No Y - Soar
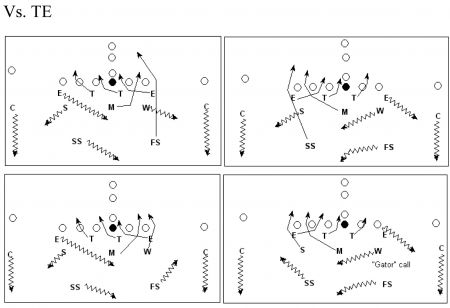
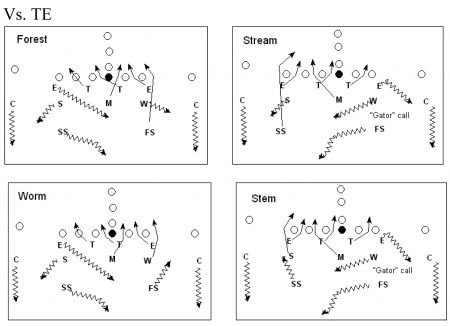
Diagram 7: Vs. No Y - Wham Diagram 8: Vs. No Y - Smash Diagram 9: Vs. Tight End - Foam Diagram 10: Vs. Tight End - Sway
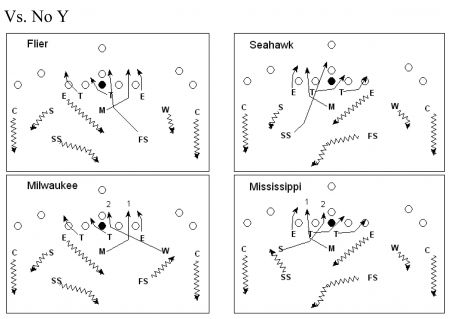
Diagram 11: Vs. Tight End - Whack Diagram 12: Vs. Tight End - Smack Diagram 13: Vs. No Y - Foam Diagram 14: Vs. No Y - Sway
Diagram 15: Vs. No Y Whack Diagram 16: Vs. No Y - Smack Additional Diagrams not in magazine:
Shaun Weaver recently completed his sixth season at Gettysburg and fifth as defensive coordinator. He previously served as defensive line coach at Bemidji State. Weaver also coached for two seasons at his alma mater, Wilmington College. He holds two Bachelor of Science Degrees from Wilmington and a Masters Degree from Bemidji State. |

 Digital Download - 304 Pages of Football Forms for the Winning Coach

|

| HOME |
MAGAZINE |
SUBSCRIBE | ONLINE COLUMNISTS | COACHING VIDEOS |
Copyright 2024, AmericanFootballMonthly.com
All Rights Reserved